
How to Set Up an Advanced Two-Zone Fire for Searing and Indirect Heat
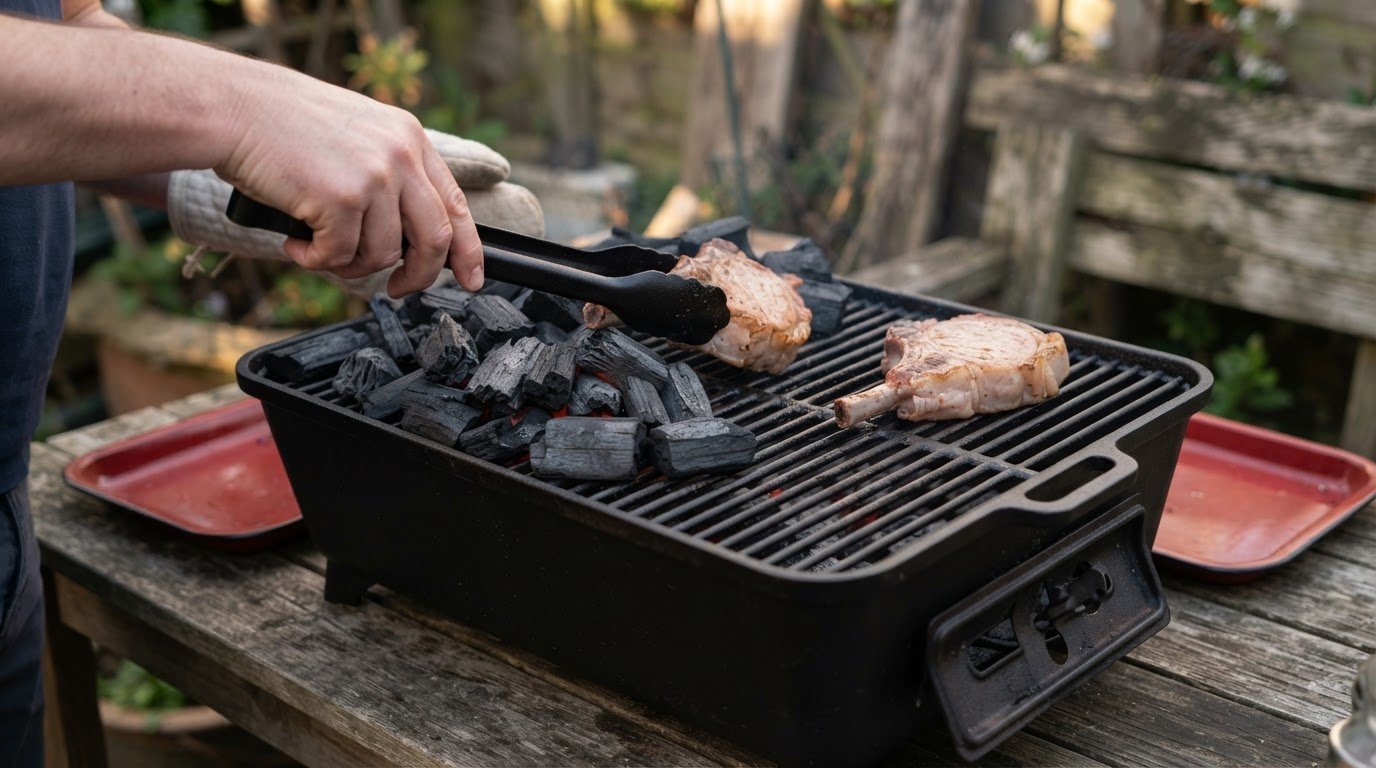
One charcoal fire can provide both gentle indirect cooking and a fierce final sear. An advanced two-zone fire setup does this by banking lit coals across half the lower grate and leaving the other half clear as a cooler zone. Cook with the lid closed away from the coals, then move food over the hot side to sear or crisp it.
That balance is the appeal: thicker cuts can cook through without staying over intense heat, while direct heat is ready for a beautifully browned finish. The key is arranging the fuel to create distinct hot and cool areas, then moving food between them as it cooks.
Here, you’ll learn how to build the charcoal zones, manage airflow and position food for indirect cooking, searing and crisping. You’ll also see how a three-zone arrangement changes the cooking space and when to use each zone for the best result.
Key Takeaways
- Arrange charcoal on one side of the lower grate to create a hot searing zone and a cooler area for cooking with the lid closed.
- Use airflow and the position of the lid vents to guide heat and smoke across food as it cooks indirectly.
- Move food between zones to cook thick cuts gently, then finish them over direct heat for a crisp, well-browned exterior.
- Explore how a Fire Cage can bring open-fire cooking into your outdoor setup when you want to build your skills beyond the standard grill.
What Is Two-Zone Fire Grilling?
Two-zone grilling creates direct heat above the coals and indirect heat away from them, letting you cook gently before searing. In the UK, barbecue use depends on where you are: follow site or landowner restrictions and local fire notices, keep the grill stable and attended, and extinguish it fully before leaving.
-
Arrange Coals on Opposing Sides
Bank charcoal on opposite sides of the lower grate, leaving a clear runway down the middle. This layout creates two direct-heat edges and an indirect centre, so you can sear over the coals before moving food into the gap to finish cooking. Keep the central space clear and position food away from flames during the indirect stage.
Use the runway for longer cuts that benefit from both methods. A whole bird or rack of ribs has room to cook slowly in the middle; rotate larger items when needed because the sides nearest the coals can cook faster.
-
Set Up Indirect Heat
Place food in the clear zone, away from the charcoal, and close the lid for indirect cooking. The lid holds heat around the food instead of exposing it directly to the coals. A gas grill can also provide indirect cooking: use a model with three or more burners, excluding side burners, and leave one area without direct flame.
Position food over the unlit area, not above an active burner. This lets the grill cook more like an oven while preserving a direct zone for searing. Plan the layout before adding food, so there’s room to move it between areas.
-
Manage Temperature and Airflow
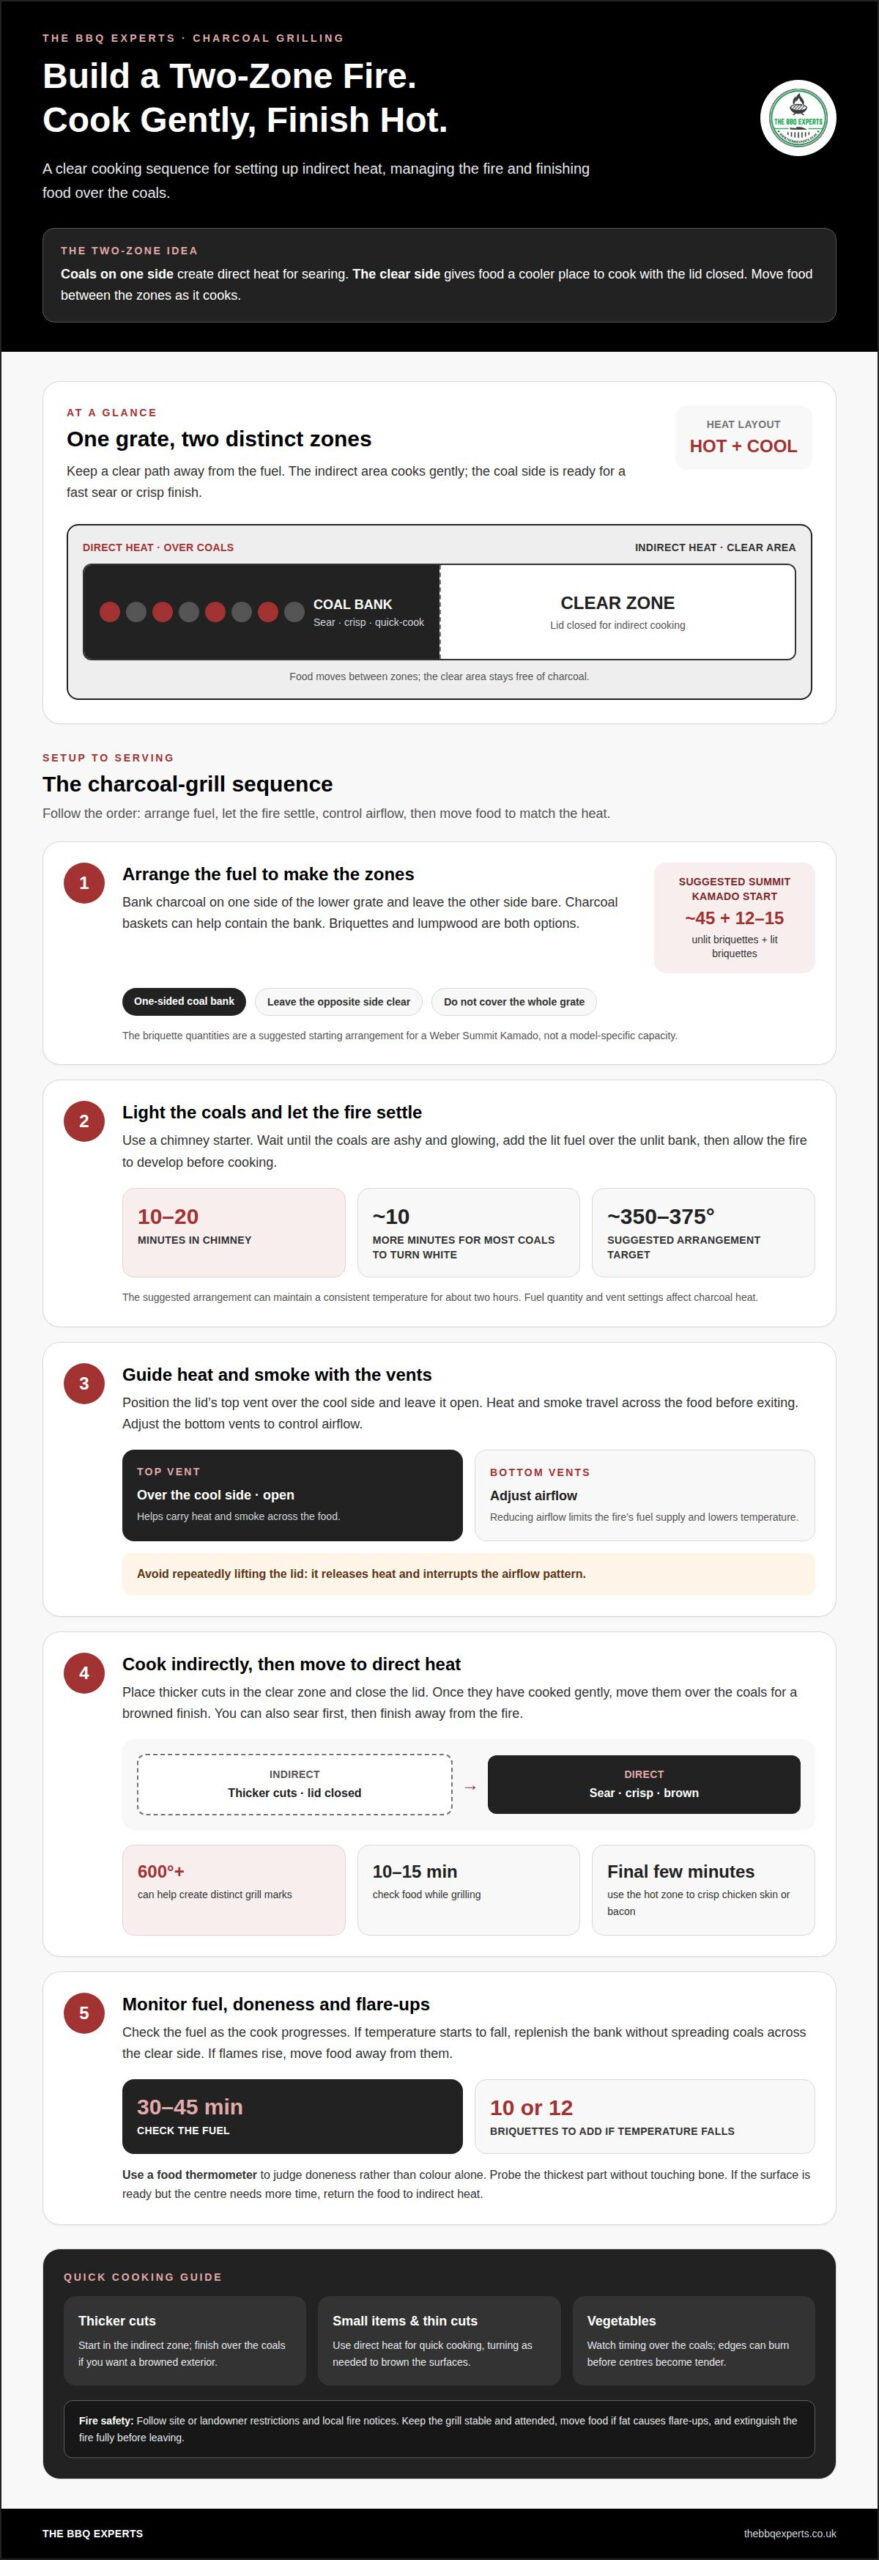
Set the lid’s top vent over the cool side and leave it open while cooking. Heat and smoke can travel across the food before exiting. Adjust the bottom vents to control airflow: reducing it limits the fire’s fuel supply and lowers the temperature.
For indirect cooking on a gas grill, the suggested configuration produces between 300 and 350 degrees. On charcoal, watch the grill’s thermometer as the fire settles; fuel quantity and vent settings affect the heat. Avoid repeatedly lifting the lid, which releases heat and interrupts the airflow pattern.
-
Move Food Between Zones
Cook thicker cuts in the indirect zone first, then move them over the coals for a direct finish. For example, sear a pork chop before moving it away from the fire to finish, or reverse the order if you want to brown it at the end. Use a food thermometer to judge doneness rather than relying on colour alone.
Reserve direct heat for the final sear, quick-cooking small items or crisping. Prolonged exposure can dry out meat, while vegetables may burn if left over the coals too long. Move food promptly once the surface reaches the colour and texture you want.
Setting up a charcoal grill for indirect cooking
Bank charcoal on one side of the lower grate and keep the other side clear. On a Weber Summit Kamado, size the bank to the cooking area rather than covering the entire grate.
-
Leave One Side Bare
Set the charcoal on one side, leaving a clear area for indirect cooking and a place to move food quickly. A pair of charcoal baskets can hold fuel in neat banks and help keep the central or opposite area open. On a Weber Summit Kamado, start with about 45 unlit briquettes, then add 12-15 lit briquettes over them. Treat these as a suggested starting arrangement, not a model-specific capacity.
Use charcoal suited to your cooking style: briquettes provide a bank of fuel, while lumpwood is another option. Big Eds Charcoal is one lumpwood choice.
-
Manage Charcoal and Grill Temperature
Light the charcoal in a chimney starter and wait 10-20 minutes, until the coals are ashy and glowing. Add the lit fuel over the unlit bank, then allow about ten minutes for most coals to turn white. The suggested arrangement aims for approximately 350-375 degrees and can maintain a consistent temperature for about two hours.
Check the fuel every 30-45 minutes. If the temperature starts to fall, add 10 or 12 briquettes; adjust the vents to regulate airflow without spreading coals across the bare side.
-
Review Fuel, Accessories, and Fire Risks
For a Weber Summit Kamado or another charcoal grill, avoid overloading the hot zone. Leave room to move food away from flames, and keep the lid accessible so you can manage the cook.
Searing and crisping food over direct heat
- Reserve the hottest part of the grate for quick searing, thin cuts and small items. Direct heat cooks food over the charcoal, so turn pieces as needed to brown their surfaces without leaving them over the coals too long. A grill temperature of 600 degrees or higher can help create distinct grill marks. For smoky flavour, add wood chunks over the coals before cooking, then watch for flare-ups.
- Choose a zone to match the food’s thickness and cooking time. Start thicker cuts in the cooler area for gentler cooking, and use the hot side for thinner cuts that need a fast sear. Vegetables need careful timing too: over direct heat for too long, their edges can burn before the centres are tender.
- Move food between zones rather than expecting one temperature to do every job. Cook a thick cut away from the coals, then transfer it to direct heat for a browned finish. To crisp chicken skin or bacon, use the hot zone for the final few minutes. If flames flare beneath the food, shift it to the cooler side until they settle.
- Use a food thermometer to assess doneness, especially with thicker pieces that brown before the centre finishes cooking. Insert the probe into the thickest part without touching bone, then move the food back to indirect heat if the surface is ready but the centre needs more time. Check food every 10-15 minutes while grilling, and avoid prolonged direct heat, which can dry out meat.
Use a thermometer to guide movement between zones. Limiting direct exposure also helps keep most meats from drying out and vegetables from burning.
Two-zone hot-and-cool fire setup
A two-zone fire places hot coals across half the charcoal basin, leaving the other half cooler for indirect cooking. A three-zone layout instead divides the coals into two equal piles on opposite sides, with food cooking in the gap.
- Spread the lit coals over half the basin to create a clear contrast between hot and cool areas. Keep the cooler side free of fuel, then place food that needs longer cooking there. This gives you a direct zone for browning and a separate area for slower cooking, without moving the charcoal during the cook.
- Match each food to the zone that suits its cooking pace. Thick pork chops can cook in the cooler area for most of the process, then move over the hot coals for a sear. Use direct heat for quicker-cooking foods, while a large slab of ribs can cook over indirect heat for several hours.
- Choose a three-zone layout when a central indirect area between two coal banks better suits your food. Divide the coals into two equal piles on opposite sides of the lower grate, leaving the middle open. Food cooks in that central gap without needing rotation, unlike larger items in a one-sided two-zone arrangement, where the side nearest the coals may cook faster.
- Set the lid’s top vent over the cool side in a charcoal setup. Heat and smoke then travel across the food before exiting, helping the indirect zone cook steadily. Use the two-zone layout for a straightforward hot side and cool side; choose three zones when you want an indirect centre bounded by heat on both sides. For help refining your grill layout, contact The BBQ Experts.
The BBQ Experts: Fire Cage
The BBQ Experts’ Fire Cage offers an open-fire option for outdoor cooking beyond a conventional grill. It suits cooks who enjoy tending a live flame and want another way to bring fire-led cooking into their outdoor space.
For a two-zone charcoal cook, Big Eds Charcoal provides a fuel option, while Angus & Oink Rubs can add a seasoned finish to food. If you’re exploring a different grilling format, the Hibachi Grill offers another way to cook over charcoal. Choose a setup that fits the food and the kind of fire experience you want, rather than expecting one piece of equipment to suit every method.
For help choosing an open-fire setup, contact The BBQ Experts.
Make Your Next Cook Your Own
Let your next barbecue be a chance to refine your instincts. Notice how the fire responds, which foods benefit from a slower finish, and when a final touch of direct heat creates the texture you want. With practice, an advanced two-zone fire setup becomes less of a fixed arrangement and more of a flexible way to shape each meal.
Build an outdoor cooking style around the flavours and tools you enjoy. Big Eds Charcoal, Angus & Oink Rubs and the Hibachi Grill can each play a part, from choosing your fuel to adding character at the table. Start with food you’re excited to cook, then let the fire and your technique develop together.
Contact The BBQ Experts for grilling advice and take the next step towards more confident outdoor cooking.
Frequently Asked Questions
What is an advanced two-zone fire setup for a barbecue?
It’s a charcoal arrangement with separate areas for cooking directly over fuel and away from it. This lets you use one fire for different stages of a meal, such as gently cooking a large joint before browning its surface. Keep the zones distinct so you can move food as its cooking needs change.
What temperatures should the hot and cool zones reach for two-zone cooking?
A suggested charcoal arrangement can produce a grill temperature of approximately 350-375 degrees. For gas grilling, the recommended two-zone configuration is 300-350 degrees. These figures describe grill temperatures, not a separate target for the cooler zone. Use the grill thermometer to follow the overall heat, and a food thermometer to assess whether the centre of a thick cut is cooked.
Disclaimer
This article was produced with AI assistance. We use AI and Third Parties to help deliver more content to our BBQ website and community, but we always aim to ensure accuracy and quality as much as we can. If you spot anything that doesn't seem right, we'd love to hear from you

Recent News & Updates
How to Set Up an Advanced Two-Zone Fire for Searing and Indirect Heat
One charcoal fire can provide both gentle indirect cooking and a fierce final sear. An advanced two-zone fire setup does this by banking lit...

Our Story, Values and Beliefs
Here at the BBQ experts we have a passion for BBQ food, outdoor living and spending time with family and friends. We offer you; A...