
How to Cook with a Fire Cage: Live-Fire Guide (2026)
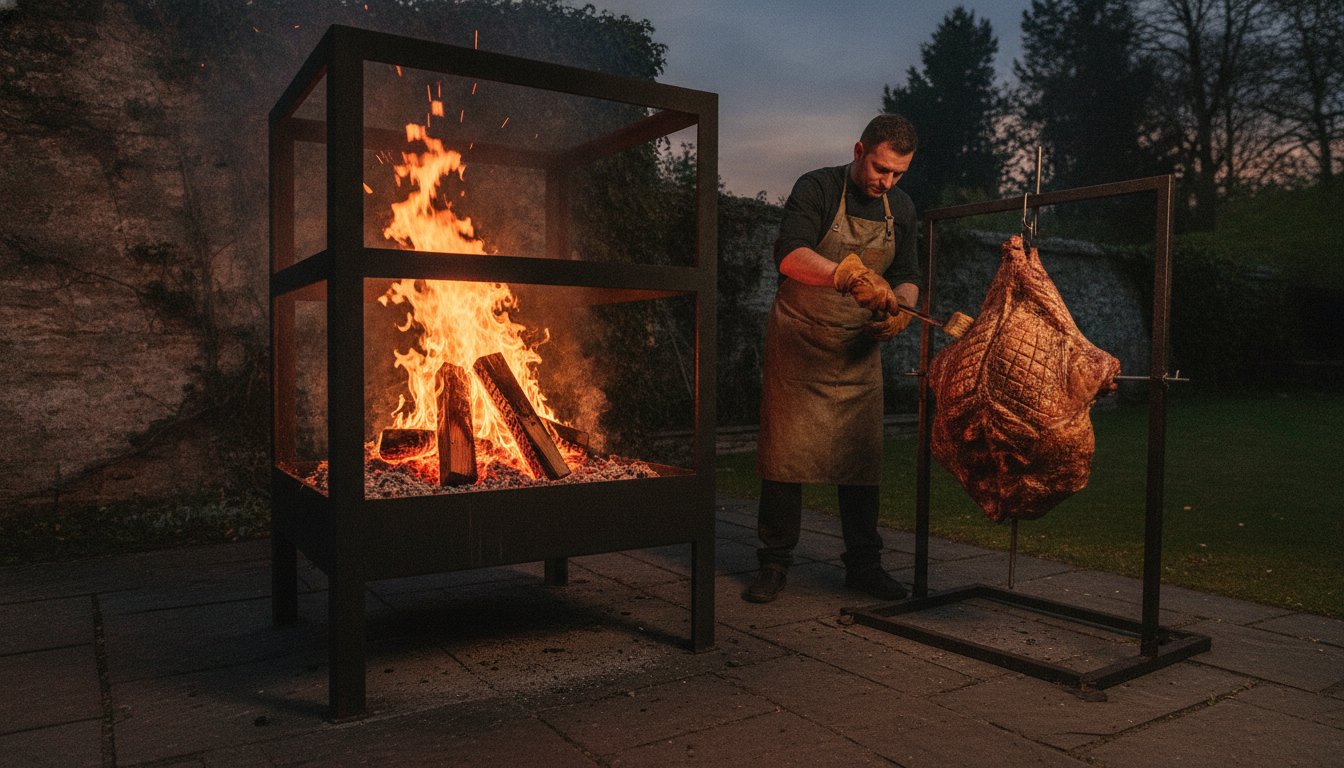
The most exquisite flavours aren’t born on a simple flat grate; they are forged in the vertical dance of a live flame. You’ve likely felt the frustration of a beautiful cut of meat charred on the outside while remaining stubbornly raw at the core. Managing an open flame can feel like wrestling with a wild animal, especially when you’re aiming for that perfect, consistent bark. This expert guide will transform your approach, teaching you exactly how to use a fire cage for cooking to achieve professional-level results that rival the world’s finest live-fire kitchens.
We’ll explore the science of thermal zones, the necessity of premium fuels like Big Eds Charcoal, and the art of finishing your masterpiece with Angus & Oink Rubs. We’ll move beyond basic grilling into the realm of true outdoor gastronomy, focusing on the precision required for high-end results. By the time we’re done, you’ll have the technical knowledge and the confidence to command your outdoor space as a refined culinary retreat. Master the heat, and you master the experience.
Key Takeaways
- Transition from horizontal grilling to the three-dimensional world of Asado-style vertical cooking for unparalleled texture and flavour.
- Master the foundational “top-down” burn and learn exactly how to use a fire cage for cooking with high-performance fuels like Big Eds Charcoal.
- Gain the expertise to read visual heat cues and manage radiant thermal zones; this allows for precise temperature control in an open-fire environment.
- Discover the secrets of the “Hang and Forget” method to produce slow-roasted joints with a professional-level bark and succulent interior.
- Build a connoisseur’s outdoor kitchen by pairing your fire cage with essential tools and finishing touches like Angus & Oink Rubs.
Understanding the Fire Cage: Elevating the Art of Live-Fire Gastronomy
A fire cage isn’t just an accessory; it’s a statement of culinary intent. It represents a fundamental shift from the static limitations of horizontal grilling to the dynamic, three-dimensional world of live-fire mastery. While a standard BBQ relies on a single plane of heat, the fire cage allows you to manipulate temperature across a vertical axis. This is the ultimate status symbol for the modern outdoor kitchen. It turns a simple meal into a theatrical performance that captivates every guest.
The Heritage of the Fire Cage
The roots of this technique stretch deep into the history of barbecue, specifically the South American Asado traditions where meat is slow-roasted over open embers. Today, this ancient ritual has been refined for the sophisticated UK garden sanctuary. When you learn how to use a fire cage for cooking, you’re tapping into a method that preserves natural juices. Fats render slowly and baste the meat as it hangs. The result is a profound smoky profile that a gas grill simply cannot replicate. There’s an undeniable emotional pull to the glowing hearth. It draws guests in and makes the cooking process the social heart of the home.
Anatomy of a Professional Fire Cage
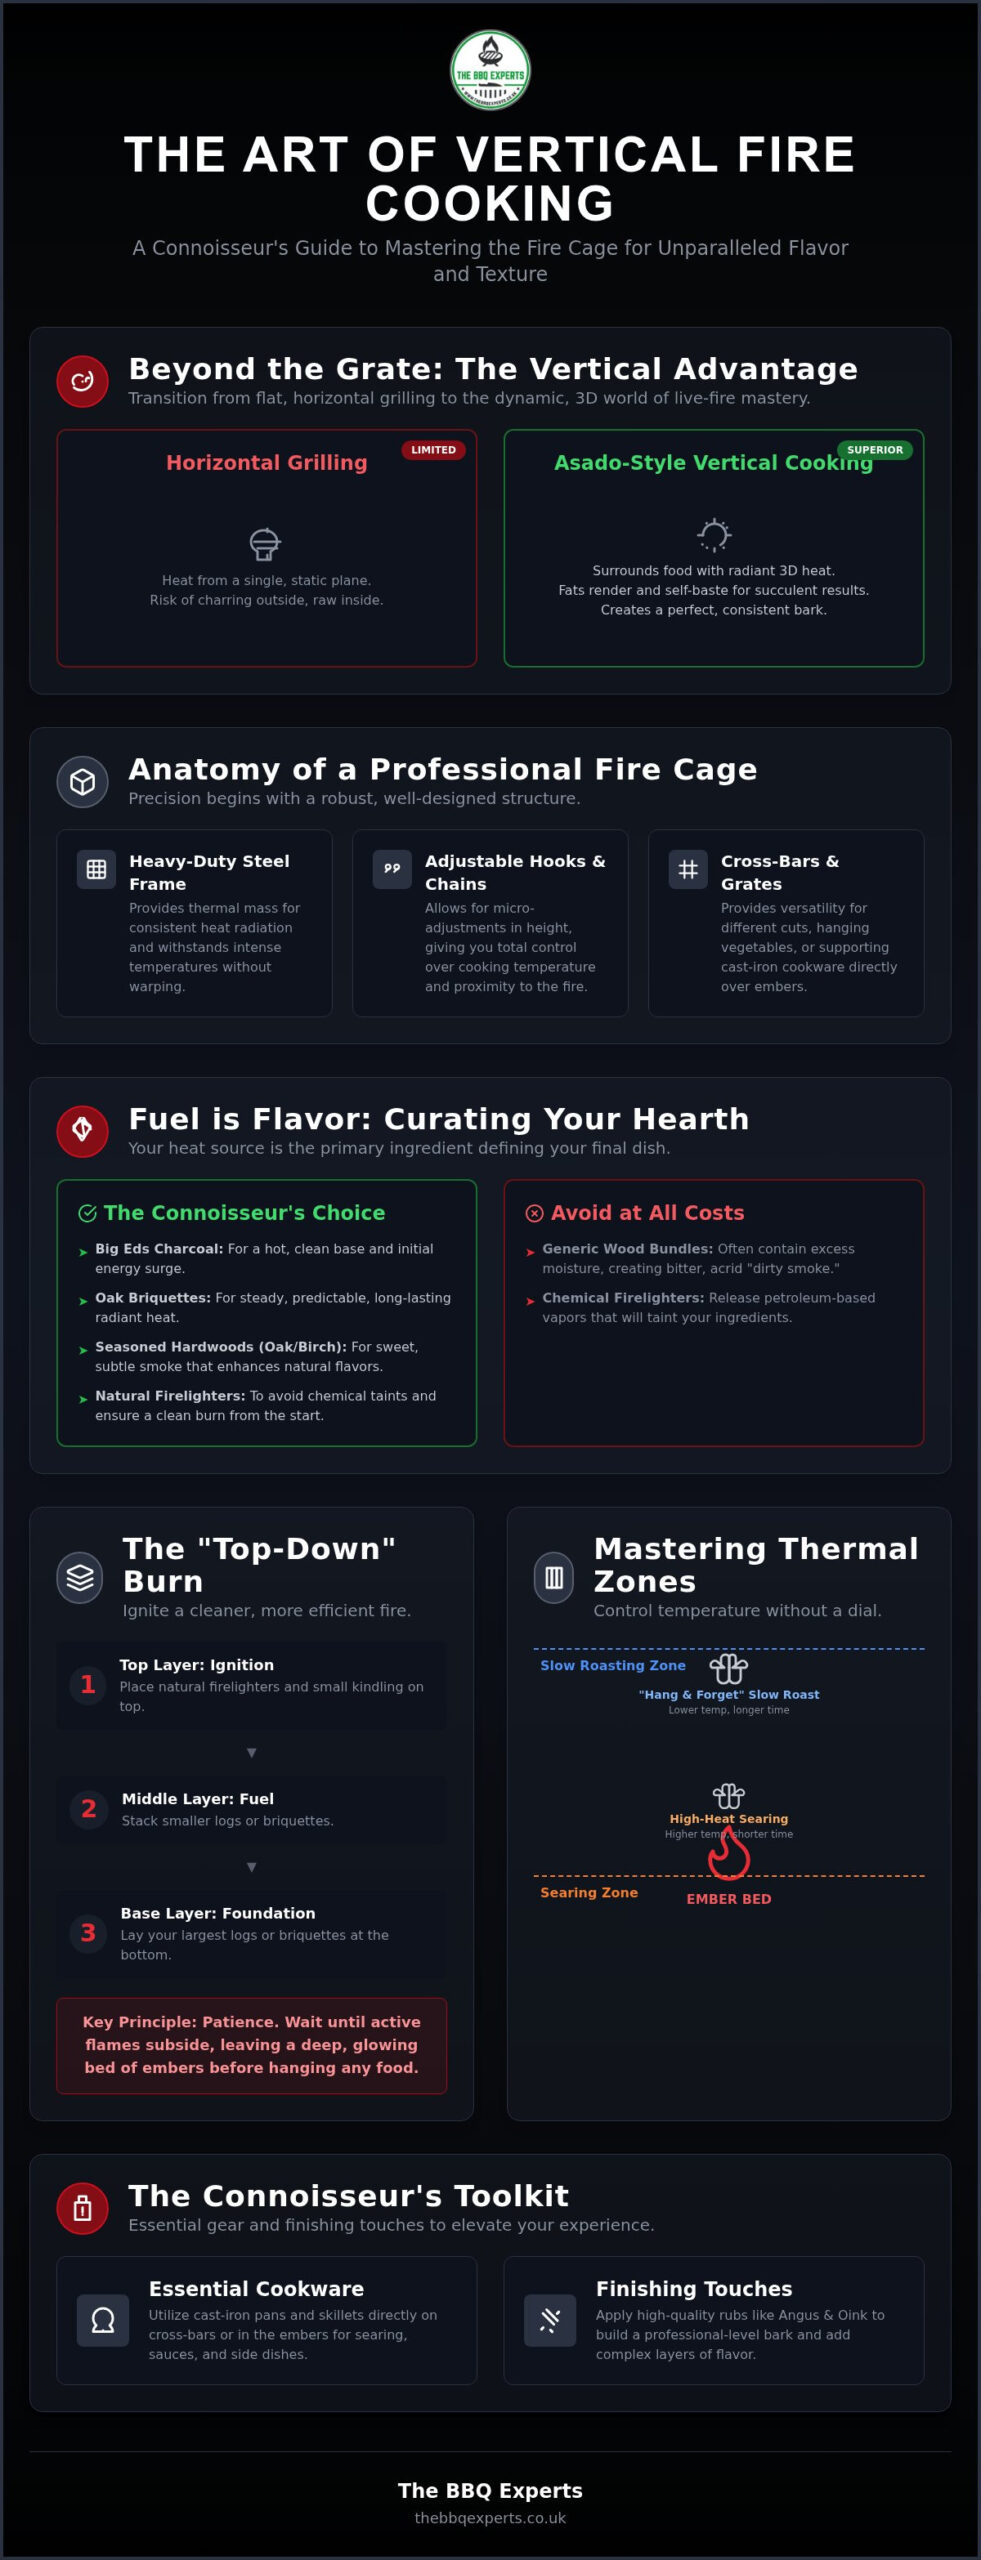
Precision begins with the build. A professional-grade fire cage must be constructed from heavy-duty steel. This provides the necessary thermal mass for consistent heat radiation. At The BBQ Experts, we curate hardware that withstands the intense environment of a live flame without warping or degrading over time.
- Robust Steel Frame: The skeleton that supports the entire structure and maintains stability under heavy loads.
- Adjustable Hooks and Chains: These allow for micro-adjustments in height, giving you total control over the thermal zones.
- Cross-bars and Integrated Grates: These provide versatility for different cuts of meat or even hanging vegetables and cast-iron cookware.
Understanding how to use a fire cage for cooking requires respecting these modular parts. By adjusting the distance between your protein and the embers, you dictate the texture of the final crust. It’s about durability and culinary precision. This ensures your investment lasts for years of high-end outdoor gastronomy. As live-fire cooking continues to evolve as a year-round craft in 2026, owning a professional-grade cage marks you as a true connoisseur of the flame.
Preparing the Hearth: Selecting Premium Fuels and Starting Your Fire
Fuel is the heartbeat of live-fire gastronomy. It isn’t just a heat source; it’s the primary ingredient that defines the final flavour profile of your dish. Using a fire cage requires a fuel that delivers consistent, long-lasting radiant energy. Generic wood bundles from a local shop won’t suffice. They often contain excess moisture, leading to “dirty smoke” that leaves a bitter, acrid coating on your meat. To master how to use a fire cage for cooking, you must curate your fuel with the same scrutiny you apply to your butcher.
The Fuel Connoisseur’s Choice
For a foundation that burns hot and clean, Big Eds Charcoal is the non-negotiable gold standard. It provides the initial surge of energy needed to establish your hearth. However, for the long-hanging joints that define the fire cage experience, we recommend incorporating Oak Briquettes. These provide a steady, predictable radiant heat that lasts for hours without constant intervention. Seasoned hardwoods like oak or birch ensure that the smoke remains sweet and subtle, enhancing rather than overpowering the natural character of the beef or pork.
Lighting for Longevity
Avoid chemical firelighters at all costs. They release petroleum-based vapours that will taint your ingredients long before the first sear. Instead, use natural firelighters to ignite a “top-down” fire. Place your larger logs or briquettes at the base, with smaller kindling and firelighters on top. This method allows the fire to burn downwards, consuming smoke as it goes and creating a cleaner burn from the start. The vertical structure of the fire cage naturally creates a chimney effect, drawing oxygen through the base to feed the growing embers.
Patience is your greatest tool. Don’t rush the cook. Wait until the active flames have subsided and you are left with a deep, glowing bed of embers. This is where the magic happens. A solid ember bed provides the stable, 3D heat distribution necessary for vertical roasting. Understanding how to use a fire cage for cooking requires a mature hearth. Before you hang your meat, verify the following:
- The embers are covered in a fine layer of grey ash.
- No visible “black wood” remains in the core of the fire.
- The heat feels intense but steady when you hold a hand near the cage.
While you wait for the hearth to mature, ensure you are following official fire safety guidelines. This includes maintaining a clear 15-foot radius from any combustible structures and having a water source or extinguisher immediately available. If you are unsure which fuel combination best suits your specific setup, speak with our seasoned team for a bespoke recommendation.
Mastering Thermal Zones: How to Control Temperature Without a Dial
Commanding a fire cage requires a shift in perspective. You aren’t just managing a fire; you’re orchestrating a symphony of radiant energy. While traditional grills rely heavily on convection within a closed lid, the fire cage is an open system dominated by radiant heat. Mastering how to use a fire cage for cooking means learning to read the environment rather than a digital thermometer. This tactile connection to the flame is what separates the amateur from the seasoned pitmaster. It’s about understanding the physics of the hearth.
Visual cues provide your first data points. Deep, glowing orange embers indicate intense, direct heat. A fine layer of white ash suggests a stable, maturing hearth that’s ready for long-term roasting. To verify these observations, use the “Hand Test.” Carefully hold your palm at the level where the meat will hang. If you can only hold it there for two seconds, you’ve found the sear zone. Five to seven seconds indicates a perfect roasting temperature. Anything beyond ten seconds is a gentle resting zone. This simple technique provides immediate, accurate feedback without the need for complex sensors.
Vertical Heat Gradients
The beauty of the vertical structure lies in its inherent temperature ladder. The Sear Zone at the base is where you initiate the Maillard reaction, creating that prized, crusty exterior. Moving up, the Roast Zone offers a steady environment where connective tissues break down without scorching the surface. Finally, the Rest Zone at the top uses the rising warmth for a gentle finish. This allows fats to render slowly and soak back into the muscle fibres, ensuring every bite is succulent. This verticality is the secret to the three-dimensional flavour profile that defines high-end outdoor gastronomy.
Creating a Two-Zone Hearth
Professional results often require more than one temperature profile. By stacking your fuel to one side of the cage, you create distinct “hot” and “cool” zones. This is essential for managing flare-ups. Instead of reaching for a water spray, which can kick up ash and drop your temperature, simply move the meat to the cooler side. This method preserves the integrity of your ember bed and the purity of your smoke. Using this two-zone approach also allows you to shield delicate ingredients like seasonal vegetables from the direct intensity of the central flame. It’s a fundamental skill for anyone learning how to use a fire cage for cooking at a connoisseur level. You gain the flexibility to cook multiple components of a feast simultaneously, ensuring everything is served at its peak.
Essential Techniques: From Slow-Hanging Joints to High-Heat Searing
Mastering the fire cage is about more than just lighting a fire; it’s about the deliberate application of technique. While many associate these structures with whole carcasses, the true connoisseur understands that the fire cage is remarkably versatile. The ‘Hang and Forget’ method is the crown jewel of vertical cooking. By suspending your meat, you allow gravity and radiant heat to work in unison. Connective tissues melt away, and fats self-baste the joint as they trickle down the exterior. This process creates a depth of flavour and a tenderness that traditional horizontal grills simply cannot match. Learning how to use a fire cage for cooking at this level requires patience and a keen eye for detail.
Securing your meat is a critical first step. Use heavy-duty S-hooks and high-quality butcher’s twine to ensure your prize remains stable throughout the cook. For larger joints, double-hooking through the ribcage or bone structure provides the necessary security. As the meat cooks, keep moisture locked in by using a herb-based basting brush. A simple mixture of butter, garlic, and fresh rosemary applied every hour adds layers of aromatic complexity while protecting the exterior from drying out in the open air.
Hanging Whole Poultry and Prime Ribs
Success with vertical roasting follows a disciplined three-step process. First, prepare your meat with a generous coating of Angus & Oink Rubs to build a complex, professional-grade bark. Next, secure the meat using a specialized poultry hanger or by hooking firmly through the thickest part of the ribcage. Finally, rotate the meat every 30 minutes. This ensures an even, golden finish across the entire surface. This rotation is vital; it prevents one side from over-caramelizing while the other remains pale, resulting in a masterpiece of texture and colour.
The Art of the Ember-Sear
The fire cage also excels at high-intensity finishing. For a perfect ‘Reverse Sear’, lower your cage grates until they sit just inches above the glowing Big Eds Charcoal. This direct contact creates an incredible crust. If you’re feeling bold, you can even attempt a ‘dirty steak’ finish by placing the meat directly onto the clean, white-hot embers for a few seconds. Once seared, move the meat to the rising heat at the top of the cage. Resting it here for 15 to 20 minutes allows the juices to redistribute, ensuring a succulent result from edge to edge. If you’re ready to specify the ultimate hardware for your outdoor kitchen, consult with our live-fire specialists today.
Understanding how to use a fire cage for cooking transforms a standard meal into a curated event. It requires a balance of raw power and delicate finesse. By combining slow-hanging stability with the aggressive heat of an ember-sear, you achieve a level of culinary precision that is the hallmark of a true master of the flame.
The Connoisseur’s Toolkit: Enhancing Your Fire Cage Experience
Your toolkit should include heavy-duty, long-reach tongs and heat-resistant gloves. These allow you to adjust hooks and chains without compromising your safety. You can also explore Direct-to-Consumer Product Sales for Burn-Fix hydrogel dressings to manage any accidental burns. A reliable digital probe is equally vital. While visual cues are paramount for reading the fire, the probe provides the empirical data needed to guarantee the perfect internal temperature for prime cuts. This combination of intuition and data is what defines the expert mentor’s approach to the flame.
Flavour layering is an art form that begins long before the meat meets the heat. We recommend matching specific Angus & Oink Rubs to your protein choice. For instance, the ‘Texas Steak’ rub provides the bold, peppery profile required for heavy beef ribs. Be mindful of timing. Rubs with high sugar content should be applied later in the process to prevent the bark from turning bitter and burnt. For a deeper profile, create a ‘mop sauce’ by mixing your chosen rub with apple cider vinegar. This keeps the meat moist and builds a complex, tacky glaze during the final hour of hanging.
The Hibachi Integration
A sophisticated outdoor kitchen often utilizes multiple heat sources to create a complete feast. A Japanese Charcoal Grill, or Hibachi, is the perfect companion for your fire cage. You can harvest glowing embers from the base of your cage to power the Hibachi, allowing you to sear delicate side dishes or small bites while the main joint continues its slow roast. This integration ensures every element of the meal is kissed by the same high-quality fuel. For a complete list of professional-grade equipment, read our Ultimate BBQ Master Checklist.
Finally, maintenance is the key to longevity. Your fire cage is a professional steel instrument that requires respect. After each use, once the structure has cooled, scrape away any residue and apply a light coating of food-grade oil. This protects the frame from the elements and prevents oxidation. By treating your hardware with care, you ensure your fire cage remains the functional centerpiece of your garden sanctuary for years to come. Learning how to use a fire cage for cooking is a lifetime’s pursuit, and the right tools make every step of that journey a joy.
Command the Flame: Your Journey into Live-Fire Mastery
Mastering the vertical hearth is about more than just equipment; it’s about reclaiming the sensory joy of outdoor gastronomy. You’ve discovered that true precision comes from reading the embers and understanding the unique thermal gradients of your setup. By choosing professional-grade hardware and non-negotiable fuels like Big Eds Charcoal, you ensure every feast is a masterpiece of texture and flavour. This isn’t just about a meal. It’s about a lifestyle transformation where your garden becomes the primary social hub of your home.
Whether you’re slow-hanging a prime rib or finishing a steak with an aggressive ember-sear, the techniques you’ve learned here provide a roadmap to success. You now have the knowledge of how to use a fire cage for cooking to transform your garden into a sophisticated culinary retreat. As the UK’s home of Angus & Oink Rubs and expert-curated hardware, we are here to support your ascent to pitmaster status.
Are you ready to elevate your lifestyle and command the flame with confidence? Explore our professional Fire Cage and Premium Fuel collection to begin your transformation. The fire is waiting, and the results will be extraordinary.
Frequently Asked Questions
Is a fire cage better than a traditional BBQ grill?
A fire cage provides a three-dimensional heat environment that a traditional flat grill cannot replicate. It allows for vertical roasting and precise management of thermal zones. This method is the ultimate choice for connoisseurs who value the theatrical, slow-roasting traditions of South American Asado. While a standard BBQ is excellent for quick searing, learning how to use a fire cage for cooking unlocks a level of texture and succulence that defines high-end outdoor gastronomy.
What kind of wood should I use in my fire cage for the best flavour?
Seasoned hardwoods are the only acceptable choice for a professional hearth. Oak is the gold standard, providing a clean, sweet smoke profile and a steady burn. For the most consistent results, we recommend using Oak Charcoal or Oak Briquettes as your foundation. Avoid softwoods like pine or larch, as they contain resins that produce acrid, dirty smoke. This will ruin the delicate balance of your Angus & Oink Rubs seasoning.
How do I stop meat from falling off the hooks into the fire?
Securing your protein is a matter of both technique and quality hardware. Always hook through the most robust part of the meat, such as the ribcage or behind a major bone. For heavier joints, use multiple S-hooks and reinforce the structure with high-quality butcher’s twine. This ensures your prize remains stable during the long roasting process. It’s a vital step when mastering how to use a fire cage for cooking without losing your meal to the embers.
Can I use a fire cage for cooking in a small garden?
You can use a fire cage in a smaller outdoor space if you adhere to strict safety protocols. Official fire safety guidelines mandate a 15-foot clearance from any combustible structures, fences, or overhanging branches. Ensure your cage is placed on a non-combustible surface like stone or brick. Constant supervision is non-negotiable. If space is extremely limited, consider a more compact setup like a Hibachi Grill for your live-fire needs while maintaining the same premium fuel standards.
How long does it take to cook a whole chicken in a fire cage?
A whole chicken typically takes between 90 minutes and two hours to reach perfection in a fire cage. The exact duration depends on your distance from the embers and the intensity of the radiant heat. Always use a digital probe to verify that the internal temperature has reached 75°C at the thickest part of the bird. This ensures the meat is safe to eat while remaining incredibly succulent, with a skin that is perfectly crisped by the rising heat.
Do I need to clean my fire cage after every use?
Caring for your professional-grade steel hardware is essential for its longevity. You should scrape away any carbonised fat or food residue from the hooks and grates after every session. Once the structure has completely cooled, apply a thin coating of food-grade oil to the steel frame. This prevents oxidation and ensures your cage remains a beautiful, functional centerpiece for your garden sanctuary. Proper maintenance reflects the pride of a true master of the outdoor kitchen.
Can I use charcoal instead of wood in a fire cage?
Using a combination of both provides the most sophisticated thermal profile. We recommend starting with a foundation of Big Eds Charcoal to establish a deep, glowing ember bed. This provides the consistent radiant heat necessary for long-term roasting. You can then add seasoned hardwood logs to introduce specific smoke flavours. This hybrid approach gives you the reliability of premium charcoal with the sensory depth of a traditional wood fire, resulting in professional-level results every time you light the hearth.
How do I control flare-ups when cooking fatty meats like pork belly?
Managing flare-ups is a test of your understanding of airflow and distance. If fatty meats like pork belly cause the flames to jump, do not reach for a water spray. Instead, use the adjustable hooks to increase the distance between the meat and the fire. Alternatively, move the protein to the cool side of your two-zone hearth. This allows the fat to render safely without scorching. It’s a precise, methodical approach that preserves the integrity of your cook.
Disclaimer
This article was produced with AI assistance. We use AI and Third Parties to help deliver more content to our BBQ website and community, but we always aim to ensure accuracy and quality as much as we can. If you spot anything that doesn't seem right, we'd love to hear from you

Recent News & Updates
How to Cook with a Fire Cage: Live-Fire Guide (2026)
The most exquisite flavours aren't born on a simple flat grate; they are forged in the vertical dance of a live flame. You've likely felt...

Our Story, Values and Beliefs
Here at the BBQ experts we have a passion for BBQ food, outdoor living and spending time with family and friends. We offer you; A...