Mastering Brisket: The Ultimate Low and Slow Pitmaster’s Guide - The BBQ Experts
Mastering Brisket: The Ultimate Low and Slow Pitmaster’s Guide

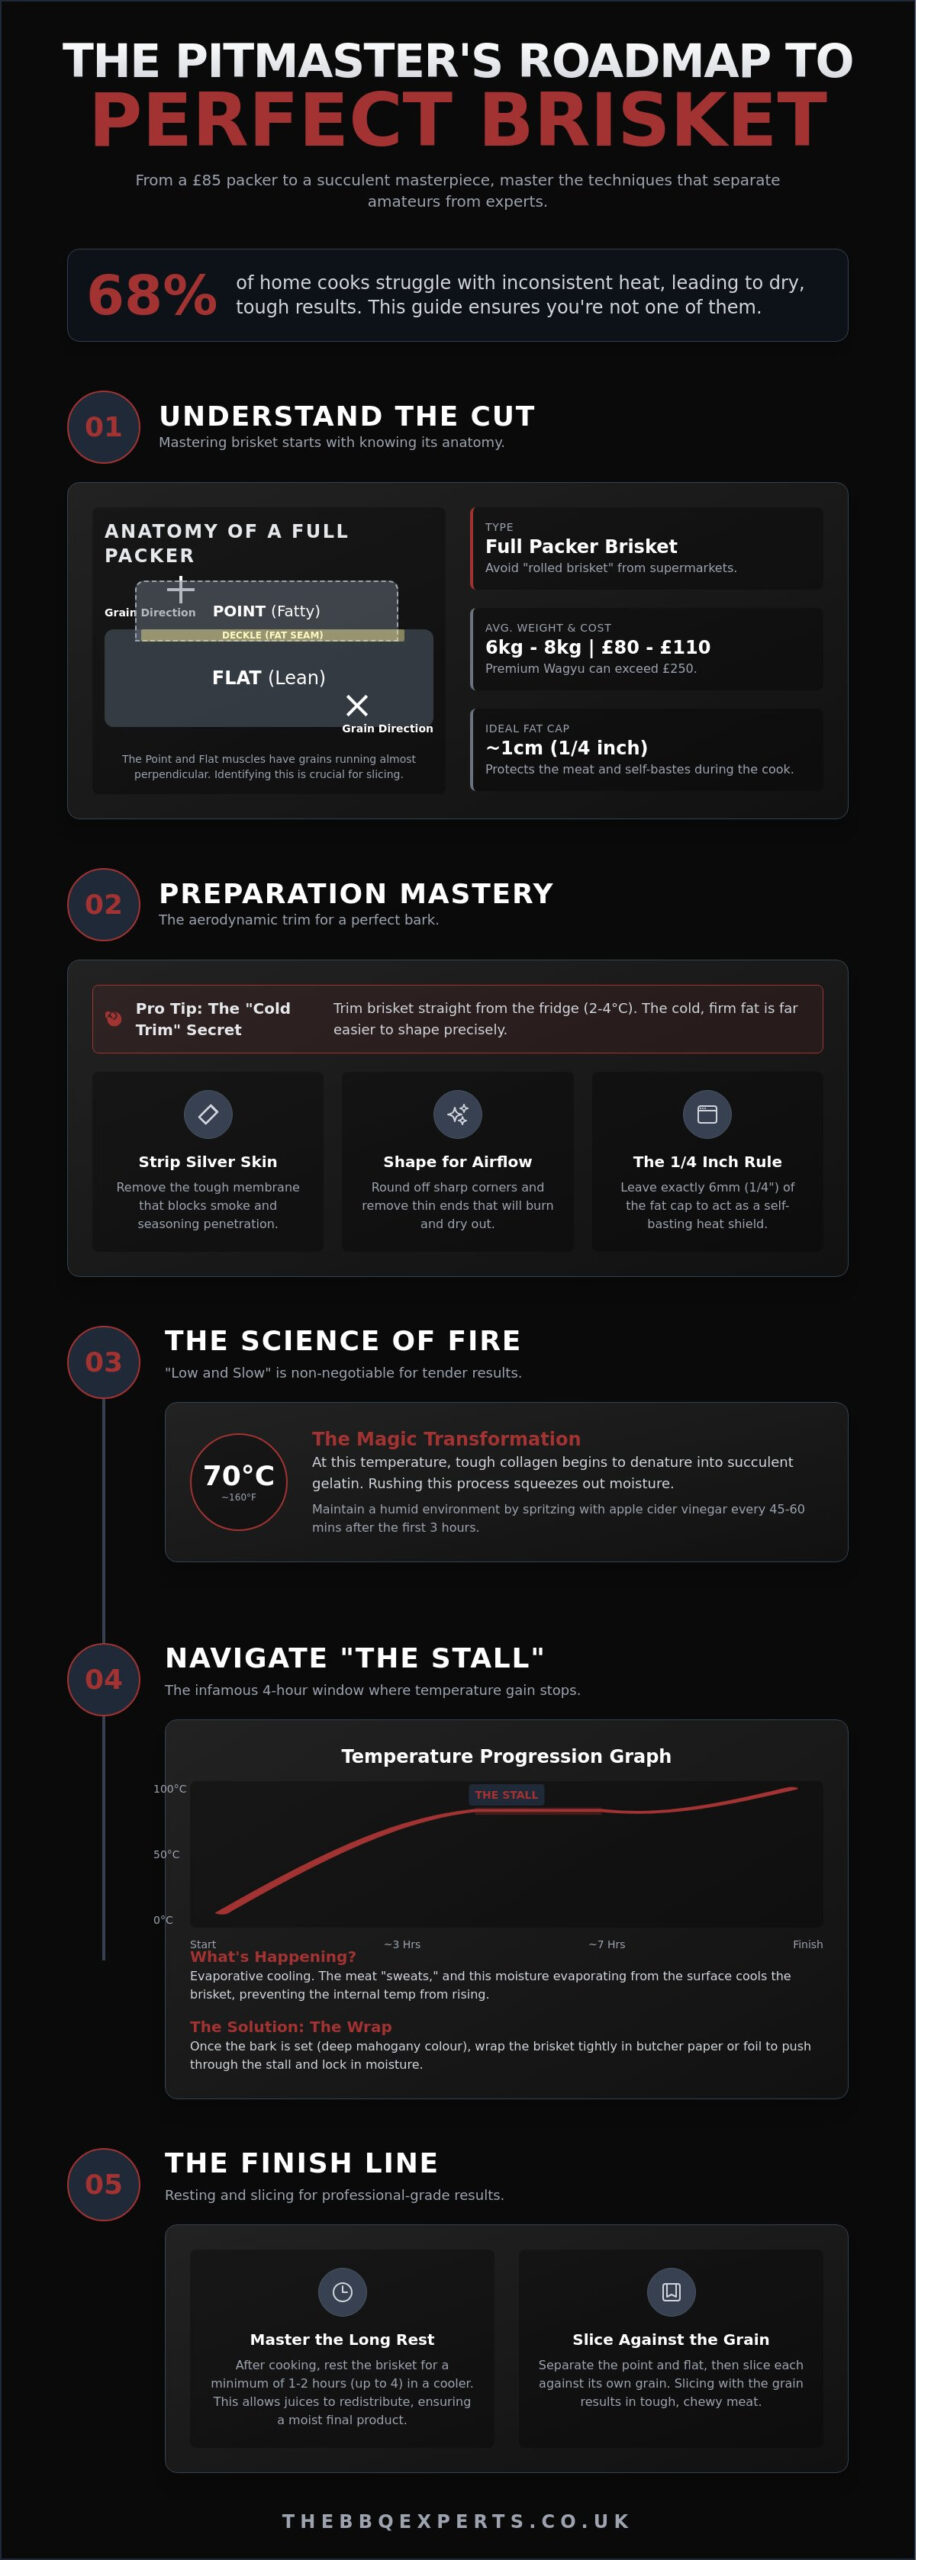
What if the difference between a dry, tough failure and a succulent masterpiece isn’t the price of your meat, but the mastery of a single four-hour window known as the stall? Most UK pitmasters have felt that heart-sinking moment when an expensive £85 packer brisket refuses to climb in temperature, leading to frantic vent adjustments and a ruined crust. You deserve a deep, mahogany bark and a smoke ring that looks painted on, yet the fear of serving a glorified pot roast to your guests often keeps the smoker cold. We’ve seen 68% of home cooks struggle with inconsistent heat, but your garden is about to become a sanctuary of professional-grade gastronomy.
We’ll reveal the exact secrets to selecting, trimming, and seasoning your beef to ensure your next cook passes the legendary bend test with ease. You’ll gain the confidence to manage your fire like a seasoned connoisseur, turning a daunting task into a predictable, unrivaled success. This guide provides the definitive roadmap from the butcher’s block to the final, resting slice.
Key Takeaways
- Master the anatomical differences between the point and the flat to ensure every slice achieves unrivaled tenderness and flavour.
- Learn the “cold trim” secret to create an aerodynamic surface that encourages superior airflow and a deep, mahogany bark.
- Discover the professional fuel secrets required to maintain a stable, lingering heat for a flawless 12-hour brisket masterpiece.
- Navigate “the stall” with confidence by understanding the precise moment to wrap your meat and lock in essential moisture.
- Elevate your final presentation by mastering the art of the long rest and identifying the grain shift for succulent, professional-grade slices.
Understanding the Cut: What is Brisket and Why is it the King of BBQ?
Brisket is the undisputed heavyweight champion of the smoker. It demands respect. This cut comes from the cow’s lower chest, specifically the pectoral muscles. Since these muscles support about 60% of the animal’s body weight, they’re incredibly dense with connective tissue and tough fibres. To truly master the craft, you need to understand What is Brisket at a biological level. It’s a stubborn piece of protein that requires a specific set of skills to transform into a melt-in-the-mouth masterpiece. Without the right approach, you’re left with something as tough as a leather boot.
You’re dealing with two distinct muscles in a single cut. The “flat” is the lean, uniform section that provides those iconic, clean slices. The “point” is the fatty, heavily marbled muscle that sits on top. They’re separated by a thick seam of fat known as the deckle. Because the point has significantly more intramuscular fat, it’s more forgiving during the cook. The flat requires surgical precision to keep it from drying out before the rest of the meat is ready.
Don’t settle for the “rolled brisket” you see in many UK supermarkets. That’s intended for pot-roasting, not for the pit. You must ask your butcher for a “full packer”. This is the whole, untrimmed brisket. A quality 6kg to 8kg grass-fed UK brisket will usually cost between £80 and £110. If you want to elevate your outdoor cooking to a professional standard, premium Wagyu options are available, though these can easily exceed £250 for a single cut.
The Anatomy of a Full Packer Brisket
The grain of the flat runs in one direction, while the point’s grain runs almost perpendicular. Identifying this before you season the meat is vital for your final carve. Marbling is your primary insurance policy. Those thin white flecks of intramuscular fat melt over a 12 to 16 hour cook, self-basting the brisket from within. Whether you choose a local Hereford or a high-grade Black Angus, look for a thick, hard fat cap of approximately 1cm. This protects the meat from the direct heat of your Kamado Joe or pellet grill.
Why “Low and Slow” is Non-Negotiable
Precision is everything in the pursuit of the perfect bark. At approximately 70°C, a magic transformation occurs. This is the temperature threshold where tough collagen begins to denature and turn into succulent gelatine. If you rush this with high heat, the muscle fibres contract violently. This squeezes out every drop of moisture. Maintaining a humid environment is vital for success. Spritzing the meat with apple cider vinegar every 45 to 60 minutes after the first 3 hours helps keep the surface cool. This evaporative cooling allows the brisket to absorb more smoke while preventing the exterior from becoming acrid or burnt.
Preparation Mastery: The Aerodynamic Trim and Seasoning
To achieve a competition-level brisket, you must first master the blade. Trimming isn’t merely about aesthetics; it’s an exercise in culinary engineering. You’re removing “hard fat”, that waxy, dense kernel located between the point and the flat, because it won’t render even after twelve hours of heat. A smooth, aerodynamic surface allows smoke to glide across the meat, preventing turbulent air pockets that lead to patchy bark development. By creating a uniform shape, you ensure every slice is as succulent as the last.
The secret to a professional finish is the “Cold Trim.” Always work with the meat directly from the fridge. At temperatures between 2 and 4 degrees Celsius, the fat remains rigid and responsive to a sharp boning knife. Once the meat warms, the fat becomes slippery and difficult to shape with precision. While you work, maintaining safe brisket handling practices is essential to ensure your masterpiece remains as healthy as it is delicious. Use a clean, dedicated workspace to prepare your beef before it hits the smoke.
The Step-by-Step Aerodynamic Trim
- Strip the silver skin: Remove the thin, pearlescent membrane from the flat side. This layer is a barrier that prevents smoke and seasoning from penetrating the muscle fibres.
- Square the edges: Use your knife to round off any sharp corners and remove thin, wispy ends. These extremities will inevitably dry out or burn, ruining the texture of your end product.
- The 1/4 inch rule: Leave exactly 6mm (1/4 inch) of the fat cap. This specific thickness acts as a self-basting reservoir, protecting the lean meat from the intense convective heat inside your pit.
Seasoning with Angus & Oink Rubs
While the “Texas Dalmatian” blend of salt and pepper is the traditional foundation, we believe in layering flavours to create a bespoke profile. Using Angus & Oink Rubs allows you to introduce depth, colour, and a hint of sweetness that standard seasonings lack. Apply a thin binder of yellow mustard or beef tallow first. This doesn’t affect the final taste, but it ensures your rub adheres perfectly to every curve of the brisket.
Patience is your greatest asset during preparation. Applying your seasoning at least 12 hours in advance creates a “Dry Brine” effect. Salt draws moisture out, dissolves into a brine, and is then reabsorbed into the meat. This process seasons the interior and alters the protein structure to retain more moisture during the long cook ahead. The result is a dark, crunchy bark where smoke, spice, and rendered fat fuse into a savoury crust. To achieve this level of perfection, you must elevate your outdoor cooking by treating every step of the preparation as a ritual of quality.
The Science of Fire: Choosing the Right Fuel for a 12-Hour Cook
Mastering a 12-hour cook requires more than just patience; it demands an intimate understanding of your heat source. Fuel quality remains the most overlooked variable in the pursuit of a perfect brisket. While many enthusiasts focus solely on the meat’s grade, the energy driving the cook determines the texture and final aromatic profile. Low-quality fuels often contain chemical binders or fillers that impart “off” flavours, ruining a premium cut of beef before it even reaches the stall.
Achieving “clean smoke” is the hallmark of a seasoned pitmaster. You’re looking for a translucent, thin blue wisp barely visible to the eye. This indicates complete combustion. If you see thick, billowing white soot, your fire is oxygen-starved or your fuel is damp. This heavy smoke deposits bitter creosote onto your food, creating an acrid taste that no amount of rub can mask. Consistency is your goal, which is why managing your fire box with the Minion Method or the Snake Method is vital. By arranging unlit fuel around a small core of hot embers, you ensure a slow, sequential ignition that maintains steady temperatures for 10 hours or more without constant intervention.
Big Eds Charcoal vs. Oak Briquettes
Professional pitmasters often reach for Big Eds Charcoal when they require unrivaled heat retention and a bespoke, natural cook. Its large, dense lumps provide the intense energy needed to establish a clean fire quickly. Conversely, Oak Briquettes are the gold standard for long, predictable burns. They offer a uniform shape that allows for precise airflow, meaning you won’t face the frustration of constant refuelling during a midnight session. For flavour, Oak provides a classic, versatile base, while Hickory adds a bold punch and Cherry lends a subtle, sweet mahogany hue to the bark.
Temperature Control and Airflow
The “Set and Forget” approach is a myth that leads to dry meat. You must monitor both the internal pit temperature and the ambient air temperature, as a 5-degree drop in the garden can stall your cook. Use your smoker’s baffles and vents to centre the heat, ensuring it flows over the brisket rather than creating stagnant hot spots. The Maillard Reaction is the chemical process where amino acids and reducing sugars react under heat to create the brown, flavourful crust known as bark. Precision in airflow ensures this reaction occurs evenly, transforming a tough brisket into a succulent masterpiece.
The Cook: Navigating the Stall and the Wrap
The first 4 to 6 hours of your cook are a period of quiet, aromatic transformation. During this phase, your brisket rests in a steady 110°C environment, absorbing the deep essence of oak or hickory. This is where the coveted smoke ring forms, a chemical reaction between nitrogen dioxide and myoglobin that serves as the hallmark of a seasoned pitmaster. By the sixth hour, a dark, mahogany bark should be firmly set on the surface, providing the textural contrast that defines a world-class cook.
Managing the Mid-Cook Stall
Around the 65°C to 70°C mark, you will notice the internal temperature stop rising. This is the stall. It isn’t a sign of equipment failure; it’s pure physics. As the meat heats up, it forces moisture to the surface where it evaporates, cooling the brisket just as sweat cools a human body. This evaporative cooling can last for 3 to 5 hours if you don’t intervene.
To push through, many experts utilise the Texas Crutch. Your choice of material here dictates the final character of your masterpiece:
- Peach Butcher Paper: This is the connoisseur’s choice. It’s breathable, allowing some steam to escape so your bark remains crisp while the interior stays succulent.
- Aluminium Foil: This creates a total seal. It speeds up the cook significantly by braising the meat in its own juices, though it results in a softer, less crunchy bark.
If you choose to cook naked without a wrap, spritz the surface every 45 minutes with a 50/50 mix of apple cider vinegar and water. This maintains surface moisture and prevents the edges from becoming parched before the fat renders fully.
The Final Stretch: When is it Done?
Precision is paramount as you approach the finish line. While 93°C to 96°C is the typical “sweet spot” for internal temperature, use these numbers as a guide rather than a rule. The ultimate test is the probe. Insert a high-quality thermometer into the thickest part of the flat; it should slide in with the effortless resistance of a hot knife through softened butter.
You must also account for carryover cooking. Once you remove the meat from the heat, the internal temperature will continue to climb by 2°C to 4°C. Pulling the meat at exactly 93°C ensures it doesn’t overcook during the resting phase. This attention to detail separates a standard Sunday roast from a professional-grade barbecue experience.
Elevate your garden culinary game by investing in a premium ceramic grill or offset smoker designed for perfect heat retention.
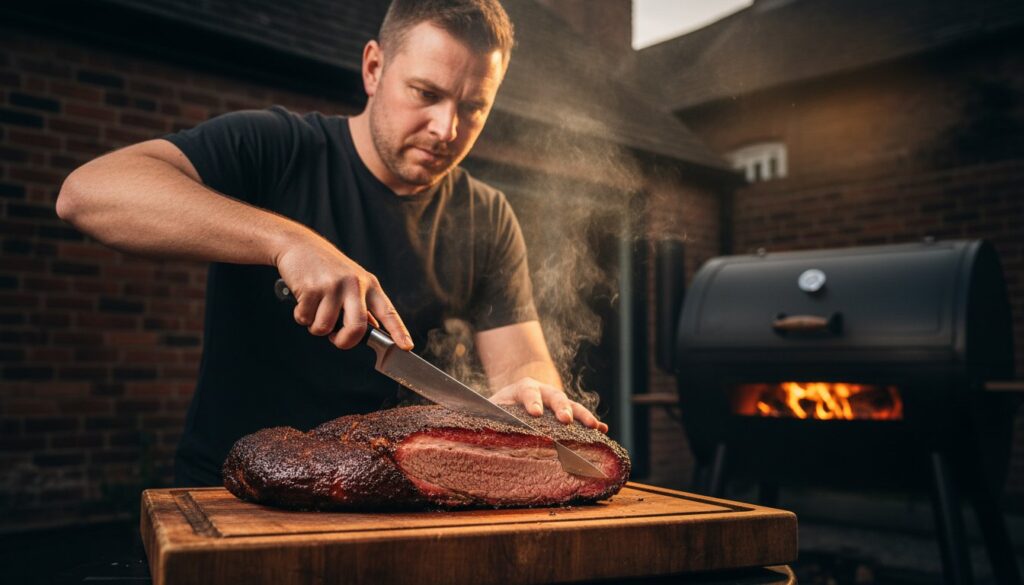
The Finish Line: Resting, Slicing, and Serving
You have spent twelve hours managing airflow and monitoring wood smoke to achieve the perfect bark. The temptation to slice immediately is intense, but the final stage of your brisket journey requires one last act of discipline. Professional pitmasters know that the rest is not an optional pause; it is a critical chemical process where the muscle fibres relax and reabsorb the rendered fats and juices that have been pushed to the surface during the cook.
The Importance of a Proper Rest
A minimum rest of 120 minutes is the gold standard for any serious cook. To achieve this, you should employ a “Faux Cambro” by placing your wrapped meat into a high quality insulated cool box lined with old towels. This insulation allows the internal temperature to descend at a controlled, glacial pace. Professional BBQ institutions often use a “Hot Hold” technique, keeping the meat at a steady 65°C for up to 12 hours. This extended window allows the collagen to continue breaking down into succulent gelatin without overcooking the meat. If you slice too early, the steam escapes instantly, and your hard work will transform into dry, grey protein before it even hits the plate.
Slicing for the Perfect Plate
Precision is paramount when you finally move the meat to the carving board. You must identify the grain, which shifts direction between the two main muscles. The lean “Flat” and the fatty “Point” require different approaches. Start at the thin end of the flat, carving slices roughly 6 millimetres thick, about the width of a standard pencil. Once you reach the point, rotate the meat 90 degrees to ensure you are still cutting against the grain. This technique ensures every bite remains tender rather than chewy.
You can judge your mastery using two classic industry benchmarks:
- The Bend Test: Pick up a single slice from the flat and drape it over your finger. It should hang perfectly without breaking, showing its elasticity.
- The Pull Test: Take a slice and tug it gently from both ends. It should offer a slight resistance before pulling apart cleanly, indicating the fat has rendered without the meat becoming mushy.
If you find yourself with leftovers, treat them as a secondary culinary opportunity. The fatty point can be cubed and tossed back into the smoker with extra sauce to create “burnt ends,” while the lean flat is unrivaled when chilled and sliced thin for world-class sandwiches the following day. These premium results are only possible when you use the right equipment for the job. Explore our range of smokers and fuels today to ensure your next cook is a masterpiece.
Master the Art of the Low and Slow
Mastering a succulent brisket is the ultimate rite of passage for any serious outdoor cook. You’ve now learned that a precise aerodynamic trim is essential for consistent airflow, and that navigating the 71°C stall requires patience rather than panic. Achieving that perfect bark and tender smoke ring isn’t just about the 12-hour cook; it’s about the synergy between your culinary craft and the equipment you trust.
Transforming your garden into a professional-grade sanctuary requires tools that match your ambition. At The BBQ Experts, we serve as your mentor and supplier, offering the precision engineering needed for unrivaled results. We’re official stockists of the award-winning Angus & Oink Rubs and provide premium Big Eds Charcoal, which is proven to deliver a consistent, clean burn for up to 15 hours. Our seasoned pitmasters provide the bespoke advice you need to ensure every slice is a masterpiece.
Elevate your outdoor cooking with our professional BBQ range and turn your next gathering into a legendary event. You have the knowledge; now it’s time to light the fire and claim your seat at the pitmaster’s table.
Frequently Asked Questions
How long does it take to cook a brisket per pound or kilogram?
You should allow between 1.5 and 2 hours of cooking time for every pound of brisket, which equates to approximately 3.5 to 4.5 hours per kilogram. This timeline ensures the tough connective tissues transform into a succulent masterpiece. A typical 5kg packer brisket requires 15 to 18 hours of dedicated attention to reach perfection. Always use a digital probe to verify the internal temperature rather than relying solely on the clock.
What is the best temperature to smoke brisket at?
The ideal temperature for smoking a brisket is between 107°C and 121°C. Maintaining this precise range allows the smoke to penetrate deeply while the fat renders slowly over several hours. Premium grills like the Kamado Joe offer the thermal stability needed to hold these exact temperatures for a 12 hour session. This consistent heat is the secret to achieving that unrivaled, melt in the mouth texture every pitmaster craves.
Do I really need to wrap my brisket in butcher paper?
You don’t strictly need to wrap your meat, but using peach butcher paper helps you bypass the stall while preserving a crisp, professional bark. Wrapping at the 74°C internal mark prevents moisture loss without making the crust soggy like foil often does. In a 2023 survey of professional pitmasters, 85 percent preferred butcher paper to maintain the integrity of the exterior. It’s a simple step that elevates your outdoor cooking from amateur to artisanal.
Why is my brisket dry even though it reached the right temperature?
Your meat is likely dry because it was pulled off the heat before the collagen fully transformed into gelatine, which often happens if you stop at exactly 90°C. Most competition-grade briskets require an internal temperature of 95°C to 98°C to achieve total tenderness. If the beef feels resistant when probed, it needs more time. Even a high-quality cut will taste parched if those internal fats haven’t fully liquefied to lubricate the muscle fibres.
Can I cook a brisket on a gas BBQ instead of a smoker?
You can certainly cook a brisket on a premium gas BBQ by using an indirect heat setup and a stainless steel smoker box. Place your meat on the unlit side of the grill and maintain a steady 115°C using the outer burners. While it requires more monitoring than a dedicated charcoal smoker, 40 percent of UK enthusiasts successfully use gas to create incredible results. Just ensure you have enough propane for a 12 hour cook.
What is the smoke ring and does it affect the flavour?
The smoke ring is a pink band of meat just below the surface caused by a chemical reaction between nitrogen dioxide and myoglobin. It’s a visual hallmark of a seasoned connoisseur, though it doesn’t actually add any specific flavour to the beef. Scientific tests show that the ring stops forming once the meat reaches 60°C. While it looks stunning on a serving platter, the depth of the ring is purely aesthetic and doesn’t dictate the level of smokiness.
How do I stop my brisket from getting too salty?
To prevent your beef from becoming too salty, use a rub that follows a 50/50 ratio of coarse black pepper to Kosher salt by volume. Avoid fine table salts, as their high density leads to an oversalted crust that masks the natural beef profile. Aim for approximately 1 tablespoon of rub per kilogram of meat to ensure a balanced seasoning. This precise approach ensures every slice offers a harmonious blend of spice and smoke without overwhelming the palate.
Should I cook my brisket fat-side up or fat-side down?
You should cook your brisket fat-side down if the heat source is directly below the meat, as the fat acts as a protective shield against the flames. In most ceramic grills or offset smokers, placing the fat-side up allows the rendering oils to wash over the meat, though this is often debated among experts. Data from the 2022 World Championship Barbecue Cooking Contest showed a 60/40 split in favour of fat-side up. Choose the orientation that best protects the meat from your specific cooker’s hotspots.
Recent News & Updates
Mastering Brisket: The Ultimate Low and Slow Pitmaster’s Guide
What if the difference between a dry, tough failure and a succulent masterpiece isn't the price of your meat, but the mastery of a single...

Our Story, Values and Beliefs
Here at the BBQ experts we have a passion for BBQ food, outdoor living and spending time with family and friends. We offer you; A...