Mastering Fire Cage Cooking Techniques: The Connoisseur’s Guide to Open-Fire Gastronomy
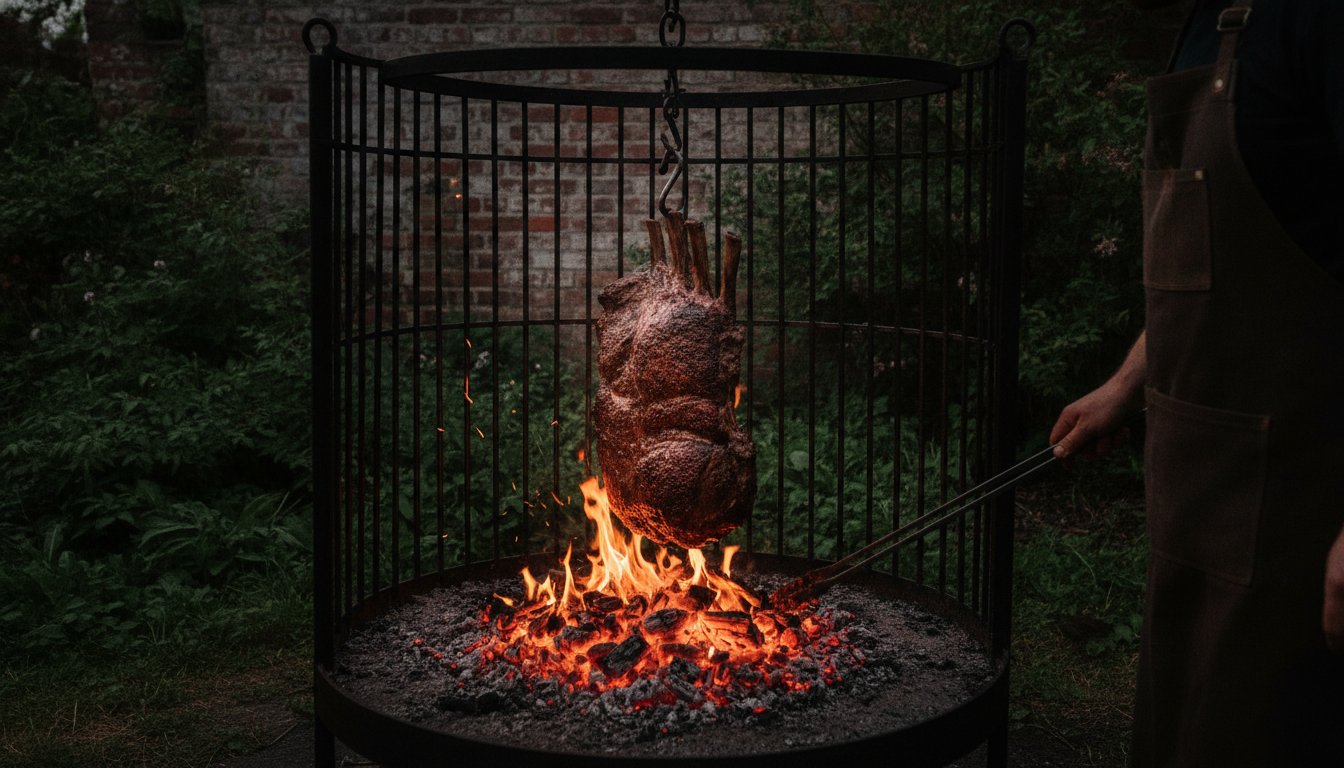
Most outdoor cooks believe that fire is a tool to be tamed, but the true connoisseur knows it is a partner to be choreographed. There is a profound difference between simply grilling over a flame and orchestrating the primal, sensory experience of a full-scale fire cage. You have likely felt the frustration of a beautiful rib of beef charred on the outside while remaining stubbornly cold at the core, or watched a sudden flare-up threaten to ruin a premium cut you spent hours preparing. Managing fuel for a long-duration cook often feels like a losing battle without the right professional approach.
We are here to bridge the gap between enthusiast and master. By understanding professional fire cage cooking techniques, you will learn to harness the physics of hanging meat and the subtle nuances of thermal distribution. This guide promises to help you achieve perfect smoke rings, impeccable bark, and a level of culinary theatre that turns your garden into a refined social hub. We will explore how to manage heat levels using premium Oak Charcoal and how to layer complex flavors with specialized Angus & Oink Rubs for a truly elevated gastronomic result.
Key Takeaways
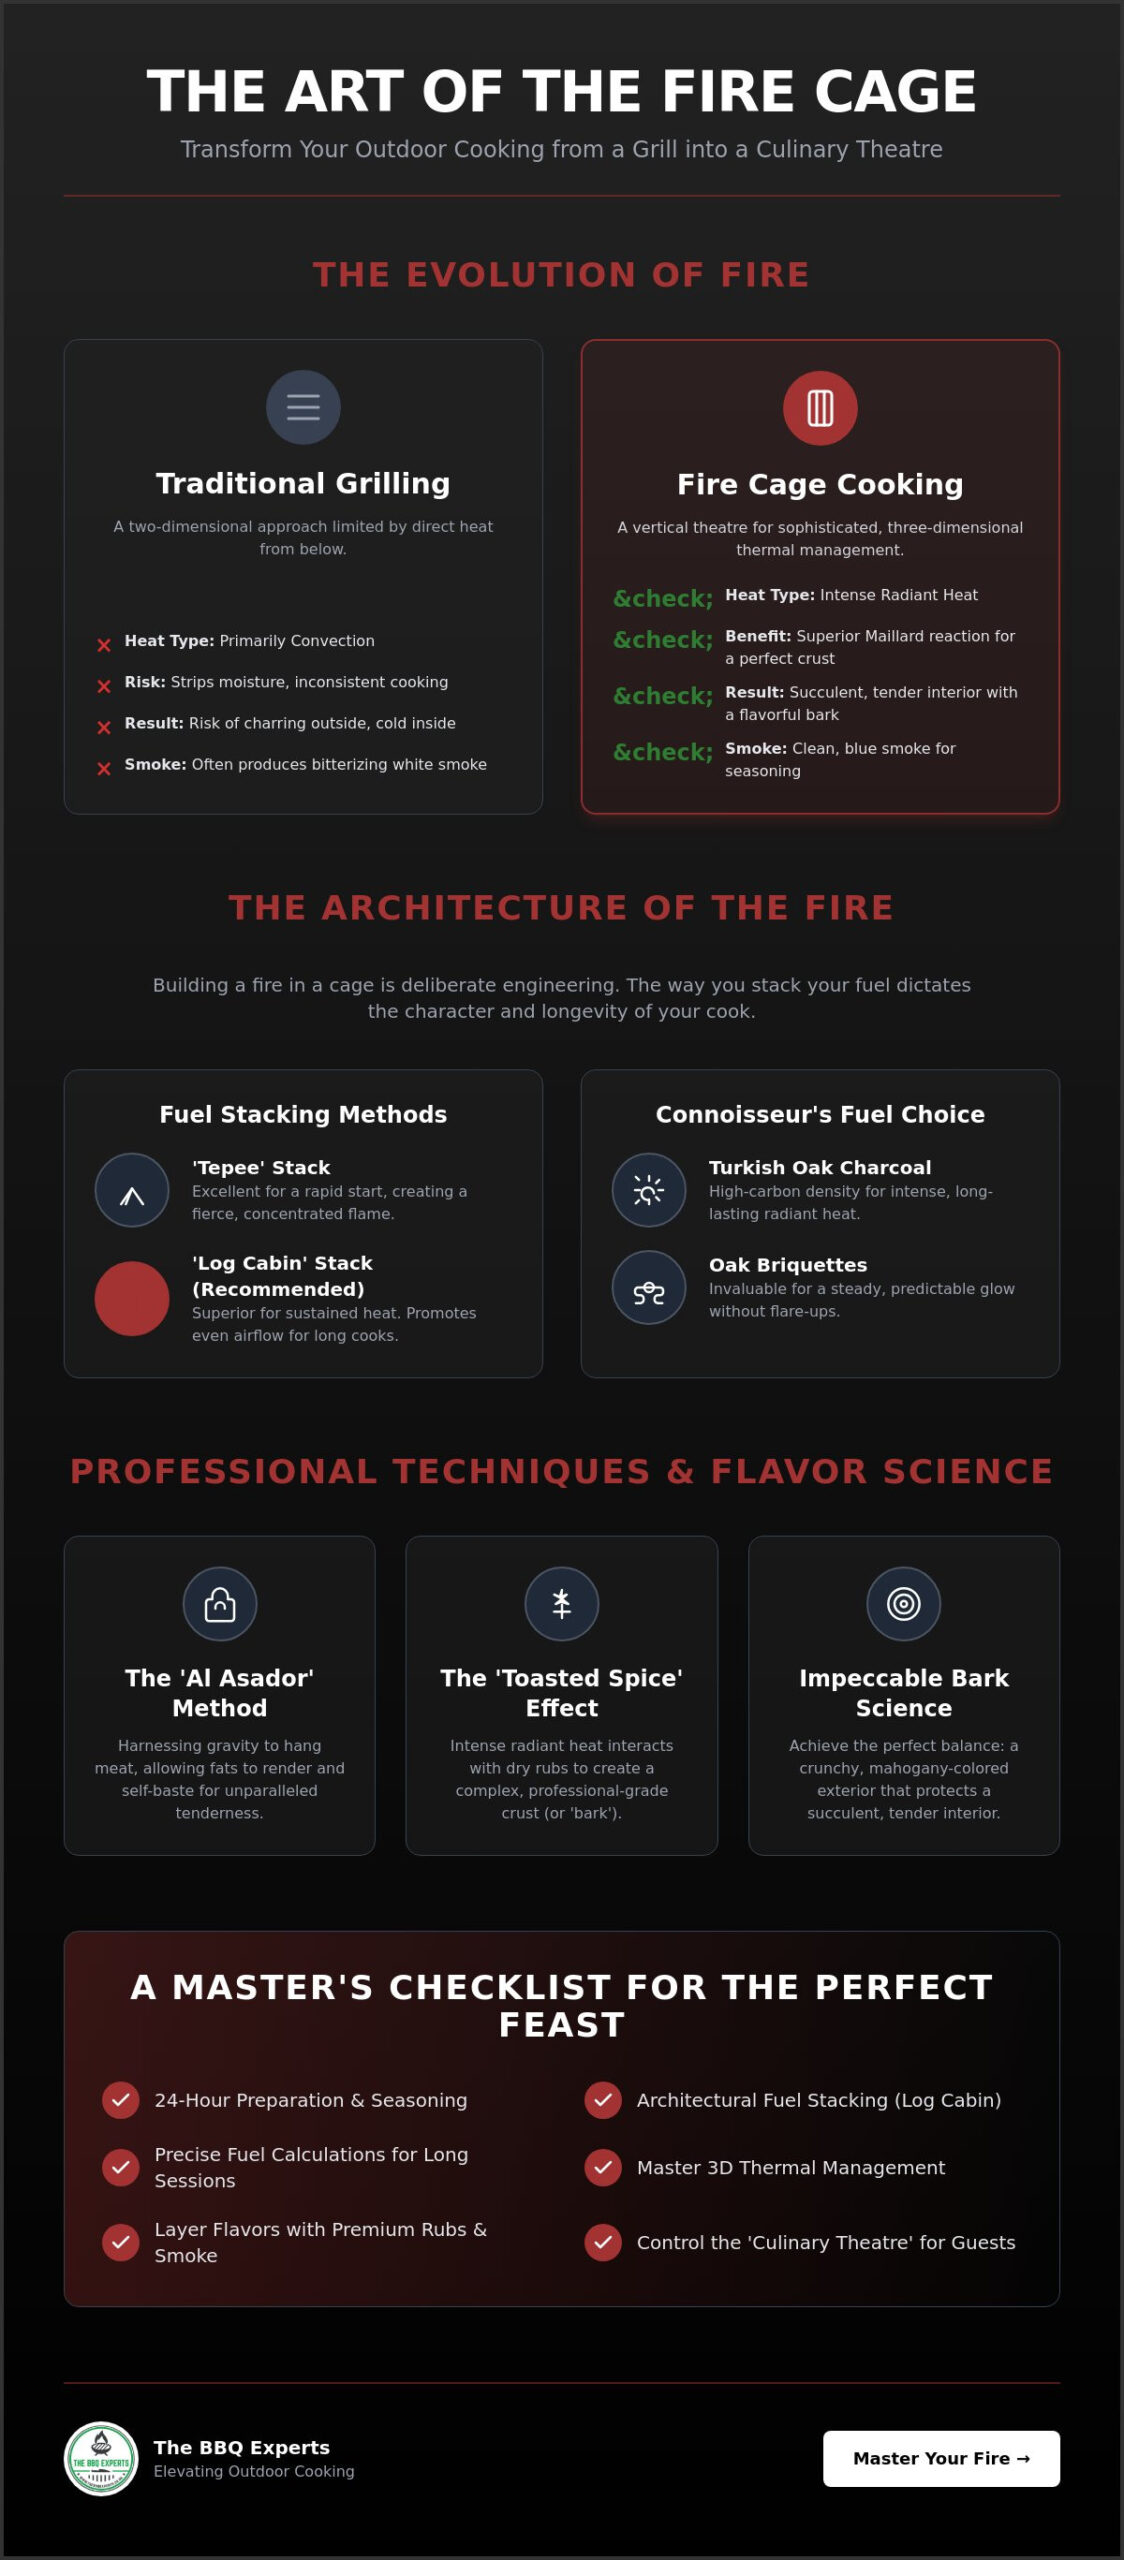
- Transform your outdoor environment into a vertical theatre by mastering the shift from traditional horizontal grilling to sophisticated three-dimensional thermal management.
- Learn the architectural secrets of establishing a high-intensity ember core using specialized stacking methods that optimize airflow for consistent, long-duration heat.
- Discover professional fire cage cooking techniques like the ‘Al Asador’ method, allowing gravity to assist in rendering fats for unparalleled tenderness and flavor.
- Understand the science of the ‘toasted spice’ effect, where intense radiant heat interacts with premium dry rubs to create a complex, professional-grade crust.
- Master the logistics of a successful feast with a connoisseur’s checklist covering everything from 24-hour preparation to precise fuel calculations for extended sessions.
The Evolution of Open-Fire Cooking: Why the Fire Cage Rules
While the history of outdoor cooking stretches back to the earliest embers of civilization, the modern Fire Cage represents its most sophisticated evolution. It isn’t just a piece of hardware; it’s a vertical theatre. Most enthusiasts are accustomed to horizontal grilling, where the heat source sits directly beneath a grate. The Fire Cage shatters this two-dimensional approach. It introduces three-dimensional thermal management, allowing you to suspend, hang, and rotate ingredients around a central column of intense energy. This shift transforms your garden into a professional culinary hub where you control the environment with surgical precision.
The technical advantage of this setup over traditional gas or charcoal grills is significant. Gas burners rely heavily on convection, which can often strip moisture from expensive cuts of meat. In contrast, the Fire Cage provides intense radiant heat. This specific energy type is what triggers a superior Maillard reaction. By mastering fire cage cooking techniques, you’re able to develop a complex, mahogany bark that gas simply cannot replicate. The result is a sensory masterpiece: a crunchy, seasoned exterior that protects a succulent, tender interior. It’s the difference between merely feeding guests and providing an unforgettable gastronomic experience.
Radiant vs. Convection Heat in a Fire Cage
The structure of the cage acts as a thermal battery. As your fuel burns, the steel walls radiate heat inward from all angles, enveloping your food in a consistent temperature field. This is far more stable than the flickering flames of a pit. Airflow plays a critical role here. Because the cage is open, oxygen flows freely, ensuring you maintain a clean, blue-smoke fire that seasons rather than sooty, white smoke that bitterizes. Using premium fuel like Oak Charcoal ensures this purity. Radiant heat penetrates the protein fibres deeply and evenly without the aggressive moisture-stripping effects of high-velocity convection. Advanced fire cage cooking techniques rely on this steady radiation to render fats slowly and perfectly.
The Theatre of the Cook
There’s an undeniable gravitas to a Fire Cage in full swing. It serves as a visual anchor for any social gathering, drawing guests toward the glowing core and the sight of hanging joints slowly turning. You aren’t just a cook in this scenario; you’re the conductor of the fire. There’s a profound psychological satisfaction in mastering the most primitive element of cooking through such a refined tool. It elevates your status from a backyard griller to a seasoned connoisseur. Every adjustment of a hook or shift of a log becomes part of the performance. This is how you transform a simple meal into a private retreat, creating an atmosphere of luxury and craftsmanship that resonates long after the last ember has faded.
Mastering the Architecture: Setting Up Your Fire Cage for Success
Building a fire within a vertical cage is a deliberate act of engineering. Unlike a standard fire pit where you simply pile wood, the fire cage requires a structured core to ensure heat reaches every level of your ingredients. Your goal is to create a sustained bed of high-intensity embers that radiate energy outward rather than just upward. This architectural approach is the foundation of advanced fire cage cooking techniques, ensuring that your primary heat source remains stable throughout a multi-hour cook.
The way you stack your fuel dictates the character of your cook. A ‘Tepee’ stack is excellent for a rapid start, drawing air quickly through the center to create a fierce, concentrated flame. However, for the sustained, three-dimensional heat a fire cage demands, the ‘Log Cabin’ stack is often superior. By layering your fuel in a square, interlocking pattern, you create a stable chimney effect that promotes even airflow. This method prevents the fire from collapsing prematurely and creates a more consistent ‘Hot Zone’ at the base of the structure.
Choosing the Right Fuel for Consistency
The soul of your fire is the fuel you select. For long-burn stability, Turkish Oak Charcoal is essential. It provides the high-carbon density needed to maintain intense radiant heat for hours without constant reloading. To supplement this, Oak Briquettes are invaluable for their steady, predictable output, offering a glow that doesn’t flare up unexpectedly. Always start your fire with Natural Firelighters to avoid the chemical taints of ‘dirty smoke’ that can ruin the delicate profile of your ingredients.
Thermal Zones and Positioning
Mastering your cage means mapping its heat profile. The bottom third is your ‘Hot Zone,’ perfect for robust proteins that require intense searing. The upper sections act as a ‘Warm Zone,’ ideal for resting meat or slow-roasting delicate vegetables. While you can find inspiration in various , the fire cage requires a more technical eye. Use a laser thermometer to calibrate the radiant output at different heights. If you find the temperature dropping, adjust the cage’s proximity to the wind. A slight breeze can fan the embers, while too much will strip away your radiant energy. If you’re unsure about the best configuration for your specific space, don’t hesitate to reach out to our expert team for a personalized consultation.
Safety remains paramount in any high-temperature setting. Always position your cage on level, non-flammable ground with at least three meters of clearance from structures or overhanging foliage. Keep a dedicated means of extinguishing the fire within reach, and never leave the conductor’s seat while the embers are at peak intensity. Mastering these foundational fire cage cooking techniques ensures your feast is as safe as it is spectacular.
Essential Fire Cage Cooking Techniques: Beyond the Grill
Step away from the horizontal constraints of a standard grate. True mastery of fire cage cooking techniques requires you to think vertically, using every dimension of the heat plume to your advantage. While many are content with simple grilling, the connoisseur looks to the ‘Al Asador’ method. By suspending large joints of meat, you invite gravity to participate in the cooking process, creating a self-basting cycle that horizontal cooking simply cannot match. This approach doesn’t just cook the meat; it transforms it into a mahogany-crusted masterpiece.
The Art of the Hang
Success starts with how you secure your proteins. You must use heavy-duty hooks designed for high-tension suspension, ensuring the weight is distributed evenly to prevent the cut from tearing. Calculating the ‘swing’ distance is your primary method of temperature control. If the meat is too close to the core, the exterior will char before the internal fats have a chance to liquefy. Conversely, a wider swing allows for a gentle, slow roast that preserves every drop of moisture. Vertical hanging improves fat rendering because it allows the melting lipids to wash down the entire surface of the meat, nourishing the muscle fibres and intensifying the bark.
Ember Roasting (Rescoldo)
Look to the base of the cage to discover the hidden potential of the ash bed. Rescoldo, or ember roasting, is a technique that utilizes the intense, residual energy of the coals. You can char leeks, peppers, and onions directly in the embers, infusing them with a deep, smoky sweetness that a grill rack cannot provide. For a truly bold finish, try the ‘dirty steak’ method by searing your cuts directly on Big Eds Charcoal. This restaurant-grade lumpwood provides a clean, intense heat that creates an incredible crust without the bitterness of inferior fuels. Simply brush off the excess ash before serving to reveal a perfectly seared exterior.
To maintain precise internal temperatures throughout an eight-hour session, you should employ the ‘swing’ technique. This involves moving the meat in and out of the primary heat plume to allow for intermittent rest periods during the cook. It’s a dynamic process that mirrors the sophisticated methods found in Francis Mallmann’s Open-Fire Recipes. By constantly interacting with the cage, you ensure that heat penetrates deeply while the exterior remains crisp and vibrant. This level of control is what separates the amateur from the expert mentor, turning a simple meal into a refined artistic creation.
The Science of Flavour: Rubs and Smoke Profiles
The intersection of intense radiant heat and specialized seasoning is where a meal becomes gastronomy. While the physical setup of your cage provides the energy, the science of flavour dictates the soul of the dish. You’ll find that fire cage cooking techniques offer a unique advantage: the ability to toast spices while they’re still on the meat. Unlike the damp environment of a lidded grill, the open-air cage allows for a dry, radiant heat that activates essential oils in your seasonings, creating a depth of flavour that’s impossible to achieve through traditional methods.
Dry rubs are the connoisseur’s choice for this environment. Wet marinades often fail in the face of open flames because the excess moisture leads to steaming rather than searing. This steam prevents the formation of a professional-grade bark. A well-balanced dry rub, focused on a specific salt-to-spice ratio, draws just enough moisture from the surface of the protein to create a tacky “pellicle.” This layer acts as an anchor for smoke particles and protects the internal moisture of the meat during long, eight-hour cooks in the open air.
The Angus & Oink Advantage
Selecting the right seasoning is a precise art. We recommend exploring Angus & Oink Rubs to find blends specifically engineered for high-heat stability. You must be mindful of sugar content. While sugar provides excellent caramelization, it burns at approximately 175°C. When using sugar-heavy rubs, you’ll need to manage your vertical height carefully, moving the meat to the “Warm Zone” at the top of the cage to prevent bitterness. Layering your flavours is also key; apply a base layer of salt and pepper 24 hours in advance, then add your complex spice blends during the final stages of the vertical cook to keep the aromatics vibrant.
Smoke Management with Premium Fuel
Your choice of fuel is your primary seasoning. For robust proteins like beef rib or brisket, Coffee Restaurant Charcoal provides a deep, earthy profile that complements the natural richness of the meat. If your goal is an ultra-clean, high-heat sear on wagyu or prime steaks, Eucalyptus Binchotan is the gold standard. It burns with incredible purity, ensuring that the natural taste of the quality cut remains the star. You can further refine the aromatic profile by introducing seasoned wood chunks into the ember bed, creating specific smoke plumes that dance around your hanging proteins. If you’re ready to curate a bespoke flavour profile for your next gathering, get in touch with our specialist team for expert guidance on fuel and seasoning pairings.
Planning Your First Fire Cage Feast: A Master’s Checklist
Orchestrating a successful open-fire feast is a test of both stamina and foresight. When you commit to a full day of fire cage cooking techniques, the process begins long before the logs are stacked. You must trim your proteins with precision, removing silver skin while leaving enough fat for that gravity-assisted rendering we explored in previous sections. Applying your dry rubs 24 hours in advance is non-negotiable. This lead time allows the salt to restructure the protein and creates the perfect foundation for a professional-grade bark that can withstand hours of radiant heat.
Logistics are the silent partner of the pitmaster. For an intensive 8-hour session, your fuel requirements are substantial. We recommend securing Bulk Buy Fuel to ensure your ember bed never falters. A common mistake is underestimating the energy needed to maintain radiant heat in an open environment, especially if the wind picks up. Beyond the fire, your toolkit must include high-spec essentials: stainless steel hooks for secure hanging, heat-resistant gloves that offer dexterity, and long-reach tongs to manage the “dirty” sear in the base embers without compromising your safety.
The Preparation Phase
Efficiency depends on your physical environment. Establish a dedicated prep station adjacent to the cage so you aren’t constantly retreating indoors. This allows you to maintain the “Expert Mentor” persona, staying present as the conductor of the fire. You should consult The Ultimate BBQ Master Checklist to ensure every piece of gear is staged and ready. Don’t forget your own hydration and temperature monitoring. A pitmaster who is overheated or distracted cannot master the subtle nuances of thermal distribution required for a perfect cook.
Post-Cook Care and Maintenance
The performance doesn’t end when the meat is carved. Protecting your investment requires disciplined post-cook care. Never use water to extinguish a large cage fire. The sudden thermal shock can warp or crack high-grade metal components. Instead, allow the embers to die down naturally or use a fire-safe snuffer if available. Once cooled, clean your stainless steel hooks and cage bars with a wire brush to prevent carbon buildup. Store any remaining premium charcoal in a sealed, dry environment. Moisture is the enemy of quality fuel, and damp lumpwood will produce the bitter smoke we strive to avoid in sophisticated fire cage cooking techniques. Maintaining your equipment with this level of rigor ensures your outdoor space remains a refined culinary retreat for years to come.
Step Into the Conductor’s Seat
You have moved beyond the basic grill and embraced the vertical theater of open-fire gastronomy. By mastering thermal zones and the art of gravity-assisted rendering, you have unlocked a lifestyle where the garden becomes your primary social retreat. You now understand that precision architecture and premium fuels are the foundation of excellence. These advanced fire cage cooking techniques aren’t just about heat; they are about the sensory joy of creating restaurant-grade results in your own home. It is a transition from simply cooking to orchestrating a primal, sophisticated performance.
As a specialist UK retailer of Hibachi and Fire Cages, we provide the tools and expertise you need to transform your craft. From the complex Angus & Oink flavour profiles to national delivery on restaurant-grade bulk fuel, your journey to mastery is fully supported. We take pride in our curation, ensuring that every tool we recommend meets a clear standard of excellence. It’s time to claim your status as a seasoned connoisseur and refine your outdoor living space.
Elevate your outdoor kitchen with our professional Fire Cage and premium fuel selection. The fire is waiting for your command.
Frequently Asked Questions
What is the best wood for fire cage cooking?
Dense hardwoods like Oak are the gold standard because they provide a long-lasting, stable ember bed. We recommend using Oak Charcoal as your base to ensure consistent radiant heat without the unpredictable flare-ups of softer woods. These dense fuels produce a clean, aromatic smoke that enhances the natural profile of your ingredients. Avoid resinous woods like pine, which can impart a bitter, sooty flavour to your gourmet cuts.
How do I control the temperature in a fire cage without a lid?
Temperature management in an open-fire environment relies on the physics of distance. You control the heat by adjusting the “swing” or proximity of your hanging meat to the central column of embers. Moving ingredients higher or further away utilizes the cooler “Warm Zone” for gentle roasting. Conversely, lowering the hooks brings them into the “Hot Zone” for a more aggressive sear. Mastering these fire cage cooking techniques allows for surgical precision without a physical enclosure.
Can I use a fire cage in a small garden safely?
You can safely operate a fire cage in smaller spaces provided you maintain a minimum of three metres of clearance from flammable structures and overhanging foliage. It’s essential to set the unit on level, non-flammable ground like stone or brick. Always monitor wind direction to prevent sparks from drifting. Because fire cages are vertical, they often have a smaller footprint than large horizontal pits, making them a refined choice for curated outdoor retreats.
Which meat cuts are best suited for hanging in a fire cage?
Large, bone-in cuts like rib of beef, leg of lamb, or whole poultry are ideal for vertical suspension. These robust proteins benefit from the slow, gravity-assisted rendering that occurs as fats melt and wash down the surface. Brisket and pork shoulder also perform exceptionally well when secured properly. The vertical orientation ensures that even the largest joints cook with a consistent internal temperature, protected by a mahogany crust developed through intense radiant energy.
How long does it take to get a fire cage up to cooking temperature?
Expect to wait between 45 and 60 minutes to establish a mature, high-intensity ember core. This time allows the structural metal of the cage to absorb energy and begin radiating heat inward. You aren’t just looking for flames; you need a stable bed of glowing coals at the base. Using Natural Firelighters and a structured “Log Cabin” stack will accelerate this process while ensuring a clean, soot-free start for your session.
Do I need to soak wood chunks before adding them to the cage?
You should never soak your wood chunks before adding them to the fire cage. Wet wood lowers the temperature of your ember bed and produces acrid, white steam rather than the clean, blue smoke necessary for fine gastronomy. For the best aromatic results, add dry wood chunks directly to the hot coals. This creates an immediate, fragrant plume that seasons your hanging proteins without compromising the thermal stability of your fire.
How do I prevent meat from falling off the hooks in a fire cage?
Secure your proteins by piercing them through the thickest part of the muscle or behind a sturdy bone structure. Using professional-grade stainless steel hooks is vital to handle the weight as the meat softens during the cook. For particularly large joints, we recommend using multiple hooks to distribute the tension. This prevents the fibres from tearing under gravity, ensuring your centerpiece remains safely suspended throughout the long rendering process.
Is fire cage cooking faster than traditional charcoal grilling?
Fire cage cooking is typically a slower, more patient endeavour designed for large-scale cuts and deep flavour development. While a traditional grill excels at rapid, high-heat searing, the cage focuses on three-dimensional thermal management and slow roasting. This methodical pace is what allows for the superior fat rendering and bark formation that defines the connoisseur’s experience. These fire cage cooking techniques are an invitation to slow down and enjoy the ritual of the cook.
Disclaimer
This article was produced with AI assistance. We use AI and Third Parties to help deliver more content to our BBQ website and community, but we always aim to ensure accuracy and quality as much as we can. If you spot anything that doesn't seem right, we'd love to hear from you

Recent News & Updates

Mastering Fire Cage Cooking Techniques: The Connoisseur’s Guide to Open-Fire Gastronomy
Most outdoor cooks believe that fire is a tool to be tamed, but the true connoisseur knows it is a partner to be choreographed. There is a...

Our Story, Values and Beliefs
Here at the BBQ experts we have a passion for BBQ food, outdoor living and spending time with family and friends. We offer you; A...