An IN-DEPTH Guide To Meat Temperatures On Your BBQ
A simple guide to Meat Temperatures on your BBQ
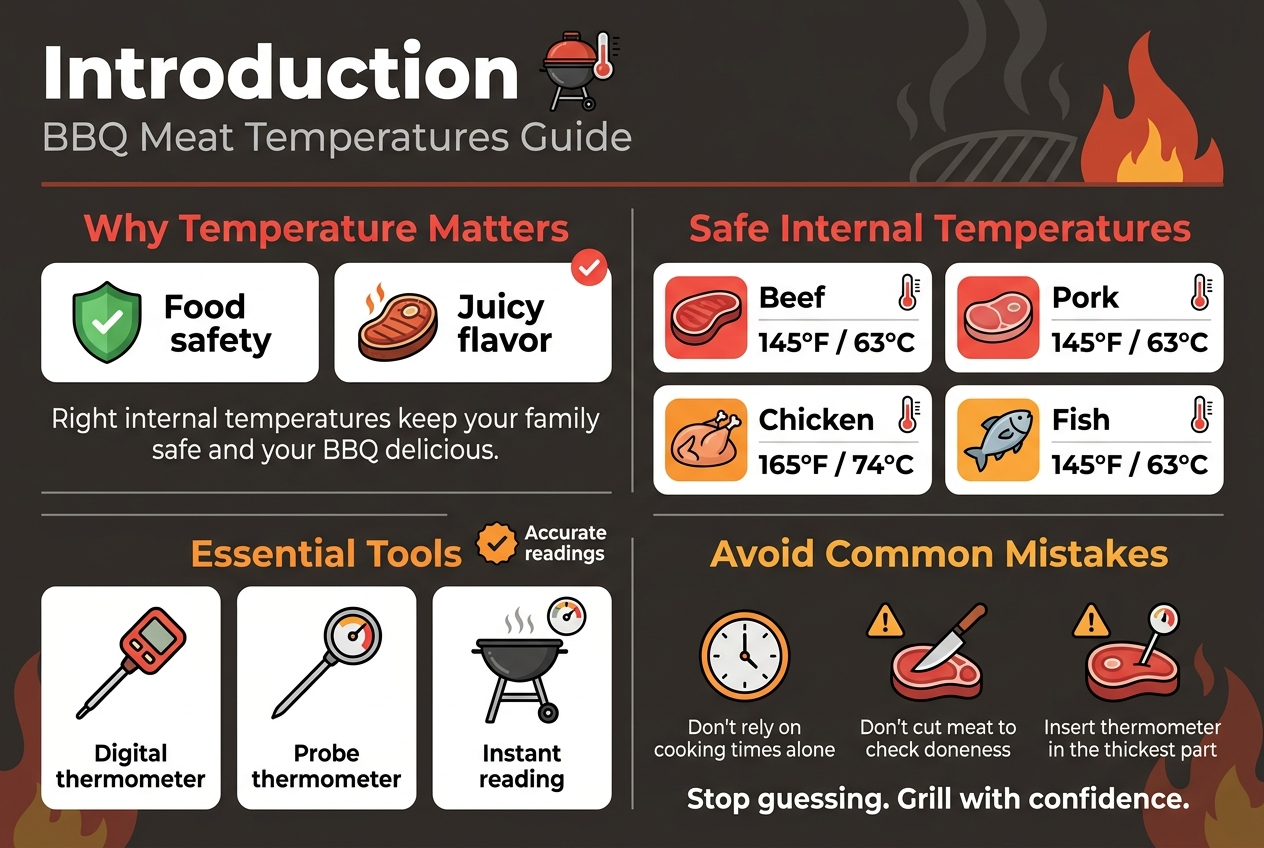
Getting your BBQ meat temperatures right can make the difference between a perfect cookout and a disappointing dinner. This guide is for home grillers who want to serve safe, delicious BBQ every time without the guesswork.
Cooking meat to the proper grilling internal temperatures keeps your family safe from foodborne illness while ensuring each cut stays juicy and flavorful. Too many backyard chefs rely on cooking times alone or cut into their meat to check doneness, but a reliable BBQ thermometer guide takes all the uncertainty out of grilling.
We’ll cover the essential tools you need for accurate temperature readings and walk you through safe cooking temperatures for beef, pork, chicken, and fish. You’ll also learn proper thermometer placement techniques that give you reliable results every time, plus we’ll highlight common BBQ temperature mistakes that can turn great ingredients into dry, overcooked disappointments.
Essential BBQ Temperature Tools for Accurate Results
Digital Instant-Read Thermometers for Quick Readings
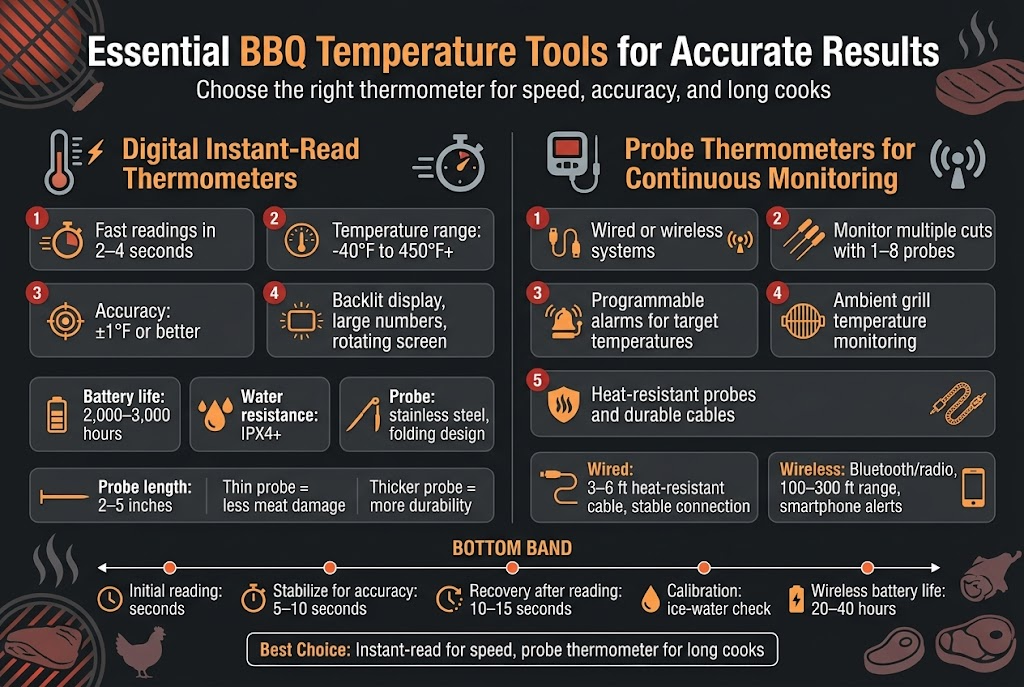
When you’re standing over a hot grill with smoke billowing around you, speed matters. Digital instant-read thermometers deliver precise BBQ meat temperatures in seconds, making them the go-to choice for most pitmasters. These compact devices slip easily into your grilling arsenal and provide the quick feedback you need to nail perfect grilling internal temperatures every single time.
The technology behind these thermometers has come a long way. Modern digital instant-read units typically feature thermocouple or thermistor sensors that respond rapidly to temperature changes. Most quality models deliver accurate readings within 2-4 seconds, though premium versions can read temperatures in under a second. This speed becomes crucial when you’re managing multiple cuts of meat or dealing with time-sensitive cooking situations.
Key Features to Look For
Temperature range stands as the most critical specification. Your BBQ thermometer guide should include models that read from at least -40°F to 450°F, covering everything from frozen meat prep to high-heat searing. Professional-grade units often extend this range to 500°F or higher, accommodating specialized techniques like reverse searing or pizza stone cooking.
Accuracy specifications matter just as much as speed. Look for thermometers with accuracy ratings of ±1°F or better. Cheaper models might drift by 3-5 degrees, which can mean the difference between perfectly cooked brisket and an overcooked disappointment. Many manufacturers provide calibration features or ice-water calibration instructions to maintain peak accuracy over time.
Display readability becomes especially important in outdoor cooking environments. Backlit screens work well in low-light conditions, while large, easy-to-read numbers help when you’re wearing sunglasses or dealing with smoke. Some advanced models include rotating displays that automatically orient based on how you hold the device.
Battery Life and Durability Considerations
Most digital instant-read thermometers run on standard AAA or button batteries. Quality units typically provide 2,000-3,000 hours of use before requiring replacement. Auto-shutoff features extend battery life significantly by powering down the device after periods of inactivity.
Water resistance ratings deserve careful attention, especially for BBQ applications. Look for IPX4 ratings or higher, indicating protection against splashing water from any direction. While these thermometers shouldn’t be submerged, they need to withstand the humid, sometimes wet conditions common in outdoor cooking.
The probe construction directly impacts both accuracy and longevity. Stainless steel probes resist corrosion and clean easily, while folding probe designs protect the sensor during storage and transport. Some models feature reinforced probe joints that resist damage from repeated folding and unfolding.
Response Time and Temperature Recovery
Understanding response time helps you use these tools effectively. Initial readings might appear quickly, but full temperature stabilization can take several additional seconds, especially when moving between drastically different temperature zones. Professional cooks often wait 5-10 seconds after the initial reading to ensure accuracy.
Temperature recovery time matters when checking multiple pieces of meat in succession. After pulling the probe from hot meat, quality thermometers return to ambient temperature within 10-15 seconds, allowing accurate readings on the next piece without cooling-related errors.
Probe Length and Thickness
Probe geometry affects both functionality and food presentation. Longer probes (4-5 inches) work better for thick cuts like whole chickens or large roasts, allowing you to reach the center without your hand getting too close to the heat. Shorter probes (2-3 inches) suffice for steaks, chops, and other thinner cuts.
Probe thickness represents a compromise between durability and food damage. Thinner probes (around 3mm) minimize holes in your meat but may be more fragile. Thicker probes (4-5mm) offer greater durability but create larger punctures that can allow juice loss.
Probe Thermometers for Continuous Monitoring
Continuous monitoring transforms BBQ cooking from guesswork into precision. Probe thermometers designed for extended use allow you to track internal meat temperatures BBQ-style without constantly opening your grill or smoker. This hands-off approach proves especially valuable for long cooking sessions where maintaining consistent heat and avoiding temperature fluctuations can make or break your results.
Unlike instant-read models, continuous monitoring systems feature heat-resistant probes connected to display units via long cables or wireless transmission. These systems excel at tracking the slow temperature rise in large cuts like briskets, pork shoulders, or whole turkeys that might cook for 8-16 hours.
Wired vs. Wireless Systems
Wired probe thermometers connect the probe to the display unit through heat-resistant cables, typically 3-6 feet long. These systems offer reliable connections without battery concerns for the probe itself. The cables can withstand grill temperatures up to 700°F or higher, and many feature braided steel construction for durability.
Wireless probe thermometers eliminate the cable connection, using radio frequency or Bluetooth technology to transmit temperature data. Modern wireless systems can transmit reliably at distances of 100-300 feet, allowing you to monitor your cook from inside the house or across the yard. Some premium models connect to smartphone apps, providing temperature tracking, alerts, and even historical data logging.
Multi-Probe Capabilities
Single-probe systems work well for simple cooking situations, but multi-probe setups offer significant advantages for complex BBQ sessions. Dual-probe systems typically monitor one piece of meat plus the ambient grill temperature, while more advanced units support 4-8 probes simultaneously.
This capability proves invaluable when cooking different cuts with varying safe cooking temperatures. You might monitor a pork shoulder targeting 203°F internal temperature alongside chicken thighs requiring 165°F, plus track your smoker’s cooking chamber temperature. Each probe can have independent target temperatures and alarm settings.
Temperature Alarms and Programming Features
Programmable alarms represent one of the most practical features in continuous monitoring systems. You can set target temperatures for each probe, and the unit alerts you when meat reaches the desired doneness. Many systems offer both audible alarms and visual indicators, with some wireless models sending alerts directly to your smartphone.
Advanced programming options include high and low temperature alarms for ambient monitoring, helping you maintain consistent cooking temperatures. Some units feature countdown timers that work alongside temperature monitoring, useful for recipes that combine time and temperature requirements.
Ambient Temperature Monitoring
Grill or smoker temperature monitoring often gets overlooked but plays a crucial role in achieving consistent results. Dedicated ambient temperature probes clip onto your cooking grates, providing accurate readings of the actual cooking environment rather than relying on built-in grill thermometers that might be positioned poorly.
This monitoring becomes especially important for offset smokers, ceramic grills, or any cooking setup where temperature varies significantly across different zones. Understanding these temperature variations helps you position different cuts appropriately based on their cooking requirements.
Probe Construction and Heat Resistance
Continuous monitoring probes face much harsher conditions than instant-read versions. They must withstand hours of exposure to high heat, moisture, and sometimes direct flame contact. Quality probes feature fully sealed construction with food-grade stainless steel housings that resist corrosion and maintain calibration accuracy over extended use.
The probe tip design affects both accuracy and food presentation. Sharp, tapered tips penetrate meat cleanly and minimize juice loss, while the sensor positioning within the tip determines how quickly the thermometer responds to temperature changes. Some probes feature stepped designs that help ensure proper insertion depth.
Cable and Connection Durability
For wired systems, cable quality directly impacts long-term reliability. High-temperature silicone jacketing protects internal wires from heat damage, while proper strain relief at connection points prevents wire breakage from repeated flexing. Quality cables remain flexible even at low temperatures, important for winter grilling sessions.
Probe-to-cable connections represent the most vulnerable point in wired systems. Look for crimped and sealed connections rather than simple twisted joints. Some manufacturers use proprietary quick-disconnect systems that allow probe replacement without cable replacement.
Wireless Range and Connectivity
Wireless probe systems must balance transmission power with battery life. Most quality units provide reliable transmission through typical residential construction at ranges of 100-200 feet. Obstacles like walls, metal surfaces, and other wireless devices can reduce effective range significantly.
Modern Bluetooth-enabled systems often include smartphone connectivity, opening up advanced features like cloud data logging, remote monitoring via internet connection, and integration with smart home systems. These features appeal to tech-savvy grillers who want detailed cooking analytics and the ability to monitor cooks from anywhere with internet access.
Battery Management for Wireless Probes
Wireless probe thermometers face unique power management challenges. The probe transmitter must operate reliably in high-temperature environments while maintaining sufficient battery life for long cooking sessions. Quality wireless probes typically provide 20-40 hours of continuous use, adequate for even the longest brisket cooks.
Some systems feature rechargeable probe batteries with magnetic charging docks, while others use standard replaceable batteries. Rechargeable systems offer convenience but may have shorter overall lifespan if the battery degrades, while replaceable battery systems provide longer service life but require ongoing battery purchases.
Calibration and Accuracy Maintenance
Continuous monitoring thermometers require regular calibration checks to maintain accuracy over time. Extended exposure to high temperatures can cause sensor drift, especially in lower-quality units. Ice water calibration provides the most accessible accuracy check, though some advanced systems include built-in calibration features or provide calibration adjustments through smartphone apps.
Professional-grade systems often include calibration certificates and may support user calibration at multiple temperature points. This level of accuracy control matters most for competition BBQ or commercial applications where consistency requirements are highest.
Safe Internal Temperatures for Different Meat Types

Poultry temperature guidelines for safety and tenderness
Poultry presents unique challenges when grilling because of its susceptibility to harmful bacteria like salmonella and campylobacter. The minimum safe internal temperature for all poultry is 165°F (74°C), regardless of the cooking method. This temperature kills dangerous pathogens while maintaining the meat’s moisture and flavor.
Chicken breasts require careful attention since they can quickly become dry and overcooked. Target 165°F in the thickest part of the breast, and consider removing them from heat when they reach 160°F, as carryover cooking will bring them to the safe temperature while resting. Dark meat like thighs and drumsticks benefit from slightly higher temperatures, around 170-175°F, which helps break down tougher connective tissues and renders fat more effectively.
Turkey follows similar BBQ meat temperatures guidelines but demands extra vigilance due to its size. Whole turkeys should reach 165°F in both the breast and thigh meat. The thigh typically takes longer to cook, so check both areas with your thermometer. For turkey breasts, the same 165°F rule applies, but many pitmasters prefer 170°F for optimal texture.
Duck and other game birds need special consideration. Wild duck is safe at 165°F, but farm-raised duck can be served at 135°F for breast meat if sourced from reputable suppliers. The legs and thighs should still reach 165°F due to their higher bacteria risk.
Chicken wings present a common grilling challenge. Their small size and irregular shape make temperature checking difficult, but they still need to reach 165°F. Look for juices that run clear and meat that easily pulls away from the bone as visual indicators when thermometer placement proves challenging.
Beef and lamb temperature ranges by doneness preference
Beef offers the most flexibility in grilling internal temperatures, with various doneness levels catering to different preferences. Understanding these temperature ranges helps deliver consistent results every time you fire up the grill.
Rare beef registers 120-125°F and features a cool red center with minimal cooking around the edges. This temperature works best for high-quality cuts like ribeye, filet mignon, and strip steaks. The meat remains very tender but may not appeal to those who prefer more cooked beef.
Medium-rare, the gold standard for many steak enthusiasts, reaches 130-135°F. The center shows warm red coloring with a perfectly tender texture. This temperature range maximizes flavor while maintaining juiciness across most beef cuts. Even tougher cuts like chuck eye or tri-tip benefit from this target temperature when properly prepared.
Medium beef hits 135-145°F and displays a warm pink center. While still juicy, the texture becomes slightly firmer than medium-rare. This temperature satisfies diners who want cooked beef without sacrificing too much moisture.
Medium-well beef reaches 145-155°F and shows just a hint of pink in the center. The texture becomes noticeably firmer, and moisture content drops significantly. Most premium cuts suffer at this temperature, but it works for those who prefer thoroughly cooked meat.
Well-done beef exceeds 155°F and shows no pink coloring throughout. The texture becomes quite firm, and moisture loss is substantial. While food safety isn’t a concern at this temperature, flavor and tenderness suffer considerably.
Lamb follows similar temperature guidelines but offers unique flavor characteristics at each stage. Lamb chops are exceptional at 130-135°F, where the meat remains tender and the distinctive lamb flavor shines. Leg of lamb can handle slightly higher temperatures, up to 140°F, while still maintaining good texture.
Ground beef requires different treatment due to food safety concerns. The grinding process can introduce bacteria throughout the meat, necessitating a minimum internal temperature of 160°F. This applies to all ground beef products, including burgers, meatballs, and meatloaf.
Pork temperature requirements for juicy results
Modern pork production has dramatically improved food safety, allowing for lower safe cooking temperatures than previously recommended. The USDA now considers 145°F safe for whole cuts of pork, followed by a three-minute rest period. This temperature produces juicy, tender pork with a slight blush of pink – perfectly safe and delicious.
Pork chops shine at 145°F, delivering optimal moisture and flavor. Thicker chops benefit from this target temperature, while thinner cuts may dry out if overcooked. Bone-in chops retain moisture better than boneless varieties, making temperature management slightly more forgiving.
Pork tenderloin, one of the leanest cuts, demands precise temperature control. Target 145°F and remove from heat promptly to prevent overcooking. The small diameter means this cut cooks quickly and can go from perfect to dry in minutes.
Pork shoulder and Boston butt follow different rules due to their high collagen content. These cuts require internal temperatures of 195-205°F to properly break down connective tissues and achieve the tender, pullable texture that makes great barbecue. The long, slow cooking process transforms tough collagen into gelatin, creating moist, flavorful pulled pork.
Ribs present a unique challenge since bone proximity makes accurate temperature readings difficult. Baby back ribs are done when they reach about 190-195°F, but many pitmasters rely on visual and tactile cues. The meat should pull back from the bones about a quarter-inch, and the rack should bend when lifted with tongs.
Pork belly requires high temperatures, around 200-205°F, to render fat properly and achieve the desired tender texture. Lower temperatures leave the fat unrendered and chewy, while proper high-heat cooking creates crispy skin and succulent meat.
Ground pork follows the same 160°F rule as ground beef due to bacterial contamination risks during processing. Sausages and other ground pork products must reach this temperature for safety, though many artisanal sausages benefit from slightly higher temperatures for optimal texture.
Fish and seafood temperature standards
Fish and seafood require careful attention to temperature since overcooking quickly ruins their delicate textures and flavors. Most fish species are safe and optimal when cooked to 145°F, though some varieties benefit from slightly different treatments.
Salmon offers flexibility in cooking temperatures based on preference. Traditional food safety guidelines recommend 145°F, but many prefer salmon cooked to 125-130°F for a more tender, less flaky texture. High-quality, sushi-grade salmon can be safely prepared to these lower temperatures when sourced properly.
Tuna steaks are often served much rarer than other fish, with internal temperatures as low as 110-115°F for a warm, seared exterior and cool, raw center. This preparation requires the highest quality fish and proper handling throughout the supply chain.
White fish like halibut, cod, and mahi-mahi should reach 145°F for food safety and optimal texture. These fish become dry and flaky when overcooked, so monitoring temperature closely prevents disappointment. The flesh should be opaque and flake easily when done.
Whole fish require temperature checks in the thickest part, typically behind the head or at the thickest part of the body cavity. The flesh should reach 145°F and appear opaque throughout. Cooking whole fish presents challenges since different areas cook at varying rates due to thickness differences.
Shrimp cook very quickly and are done when they reach 145°F, though visual cues often work better than temperature readings due to their small size. Properly cooked shrimp appear opaque and pink, with flesh that feels firm but not rubbery.
Lobster and crab should reach 145°F in the thickest part of the meat. Overcooking makes shellfish tough and rubbery, so careful monitoring prevents these expensive proteins from becoming disappointing meals.
Scallops present unique challenges since their small size makes thermometer use difficult. They’re done when they reach 145°F, but visual and tactile cues work better. Properly cooked scallops feel firm but not hard and appear opaque throughout.
Using a reliable BBQ thermometer guide becomes crucial when grilling seafood since the window between perfectly cooked and overcooked is very narrow. Digital instant-read thermometers work best for fish and seafood, providing quick, accurate readings that help prevent overcooking these delicate proteins.
Proper Thermometer Placement Techniques
Identifying the Thickest Part of the Meat
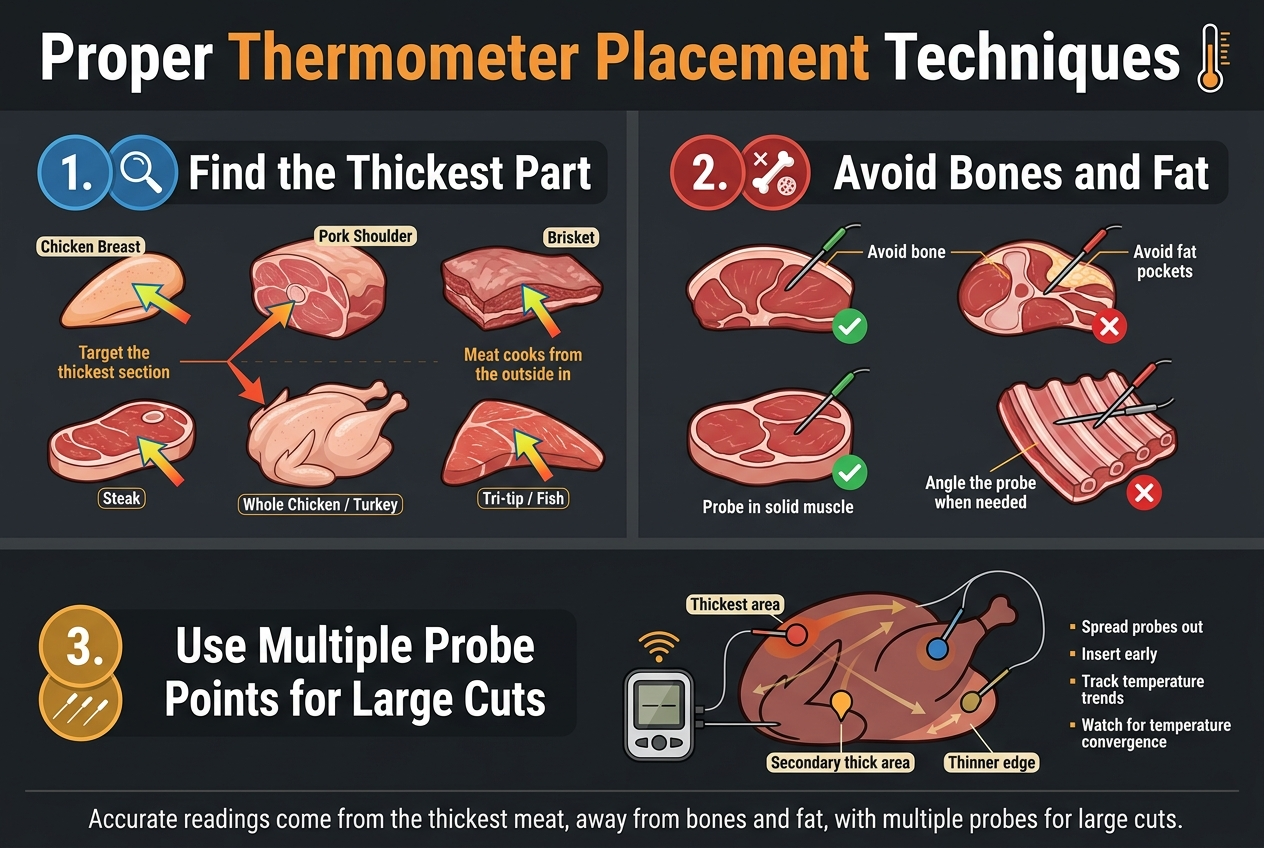
Proper BBQ meat temperatures depend entirely on where you place your thermometer probe, and the thickest part of the meat is your target zone. This area takes the longest to cook through, making it the most reliable indicator of doneness. When you nail the temperature in the thickest section, you can be confident the entire piece is properly cooked.
Finding this spot requires a bit of visual assessment and gentle probing. For chicken breasts, look for the center of the meatiest portion, typically where the breast is widest. With pork shoulders or beef briskets, the thickest area usually sits in the middle of the cut, away from any tapered edges. Steaks present their thickest point right in the center, while whole chickens or turkeys require checking the thickest part of the thigh.
The key is understanding that meat cooks from the outside in. The exterior surfaces heat up first, while the interior core remains cooler longer. By targeting the thickest section with your thermometer placement techniques, you’re measuring the slowest-cooking area. This prevents the common mistake of pulling meat too early when the thinner edges are done but the center remains undercooked.
Visual cues help identify these zones before you even pick up your thermometer. Look for areas where the meat appears fullest or most rounded. Run your fingers along the surface to feel for the meatiest sections. With practice, you’ll develop an eye for spotting these crucial measurement points without much effort.
For irregularly shaped cuts like tri-tip or whole fish, the thickest part might not be immediately obvious. Take a moment to examine the entire piece, turning it if necessary. The investment in proper identification pays off with consistently perfect internal meat temperatures BBQ results.
Some pitmasters use the “finger test” method, gently pressing different areas of the meat to gauge thickness. While this technique works, combining it with visual assessment gives you the most accurate identification of where to place your probe for reliable grilling internal temperatures.
Avoiding Bones and Fat for Accurate Readings
Bones and large fat deposits create major obstacles to accurate temperature readings, and understanding why helps you become a better grilling temperature guide for yourself and others. Bones conduct heat differently than meat tissue, often running hotter or cooler depending on their size and the cooking method. Fat renders at different rates and temperatures compared to muscle tissue, creating inconsistent readings that can mislead your BBQ thermometer guide efforts.
When you insert a probe into bone, you’re essentially measuring the bone’s temperature rather than the surrounding meat. Bones heat up faster in some cases, giving you a false high reading that might trick you into thinking your meat is done when it’s actually undercooked. In other situations, particularly with large, dense bones, the bone acts as a heat sink, staying cooler longer and providing misleadingly low temperatures.
The same principle applies to thick fat caps and marbling. Fat doesn’t need to reach the same internal temperatures as meat for food safety, and it can insulate the probe from getting an accurate muscle tissue reading. When your thermometer sits in a fat pocket, you might get temperatures that don’t reflect the actual doneness of the meat itself.
Practical avoidance techniques start with understanding your cut’s anatomy. Ribeye steaks have significant marbling, so aim for areas with more solid muscle. T-bone and porterhouse steaks have that obvious bone barrier running through the middle – stay clear and probe the meat sections on either side. For bone-in chicken thighs, slide your probe into the meatiest part of the thigh muscle while avoiding the bone completely.
Ribs present unique challenges since they’re essentially meat strips between bones. Target the center of the meat between two bones, angling your probe parallel to the bones rather than toward them. This technique gives you the most accurate reading of the actual meat temperature without bone interference.
Large roasts with bones running through them require strategic thinking. Insert your probe at an angle that penetrates deep into the muscle tissue without hitting bone. Sometimes this means coming in from the side rather than straight down from the top. The goal is getting your probe tip surrounded completely by meat tissue.
Fat avoidance requires similar strategy. Look for areas where the fat layer is thinner or where you can penetrate through a small fat section into the main muscle mass. Don’t try to avoid fat completely if it means settling for a thin area of meat – just make sure your probe tip ends up in solid muscle tissue rather than sitting in a fat pocket.
Professional pitmasters often use multiple probe points to work around bones and fat effectively. If one angle doesn’t work due to bone placement, they’ll try another approach until they find clear muscle tissue. This flexibility in approach separates good BBQ temperature techniques from amateur attempts.
Multiple Probe Points for Large Cuts
Large cuts like whole turkeys, beef briskets, pork shoulders, and prime rib roasts cook unevenly due to their size and shape variations. Single-point temperature monitoring simply can’t capture the full picture of how these massive pieces of meat are progressing. Multiple probe points become essential for achieving consistent results across the entire cut.
The strategy behind multiple probes centers on understanding heat distribution patterns in your cooking environment. Depending on your grill or smoker design, certain areas might run hotter or cooler. The side closest to the fire box typically cooks faster, while areas near the cooler zones take longer to reach target temperatures. By using several probes, you track these variations and make informed decisions about when your meat is truly ready.
Start with at least two probes for most large cuts – one in the thickest section and another in a secondary thick area that might cook differently. For whole turkeys, this means one probe in the thickest part of the breast and another in the meatiest thigh section. These two areas cook at different rates due to their composition and position relative to the heat source.
Brisket monitoring benefits tremendously from multiple probe points due to the cut’s size and the significant difference between the point and flat sections. The point contains more fat and connective tissue, while the flat is leaner and denser. Each section reaches optimal doneness at different times, and single-probe monitoring might leave you with one perfect section and one overcooked or undercooked area.
Three-probe setups work well for extra-large cuts or when precision is critical. Position probes in the thickest area, a medium-thickness section, and near a thinner edge. This arrangement gives you a complete temperature profile across the entire piece. You’ll know when the thickest part hits your target while monitoring whether the thinner areas are climbing too high.
Wireless thermometer systems with multiple probes make this process much more manageable than trying to juggle several individual thermometers. Many modern systems allow you to set different target temperatures for each probe, accounting for the fact that different sections might need slightly different endpoints.
Probe placement spacing matters for large cuts. Don’t cluster all your probes in one general area – spread them out to capture genuine temperature variations. For a large pork shoulder, you might place one probe in the center, another toward one end, and a third probe positioned differently to avoid any bones or unusually thick fat areas.
The timing of probe insertion affects your results too. Insert all probes early in the cooking process rather than waiting until near the end. This gives you temperature trend data throughout the cook, helping you predict when different sections will be ready. Some pitmasters insert probes before the meat even goes on the grill, ensuring they don’t lose heat by opening the cooking chamber later.
Monitoring multiple probes requires a systematic approach to avoid confusion. Label each probe or use a system where you remember which reading corresponds to which area. Many wireless systems allow custom naming for each probe channel, making tracking much simpler.
Large cuts often benefit from probe repositioning during longer cooks. What starts as the thickest part might change as the meat shrinks and reshapes during cooking. Don’t hesitate to adjust probe positions if you notice readings that don’t make sense compared to your other probes.
Temperature convergence across multiple probes signals that your large cut is approaching doneness uniformly. When all probes start reading within a few degrees of each other, you know the heat has penetrated evenly throughout the meat. This convergence, combined with your target internal temperatures, gives you confidence that the entire cut is properly cooked.
The investment in multiple-probe monitoring pays dividends in consistency and food safety. Rather than guessing whether your large cut is done based on one temperature reading, you have comprehensive data that removes the uncertainty from BBQ temperature decisions.
Temperature Guidelines for Popular BBQ Cuts
Brisket Temperature Milestones and Resting Periods
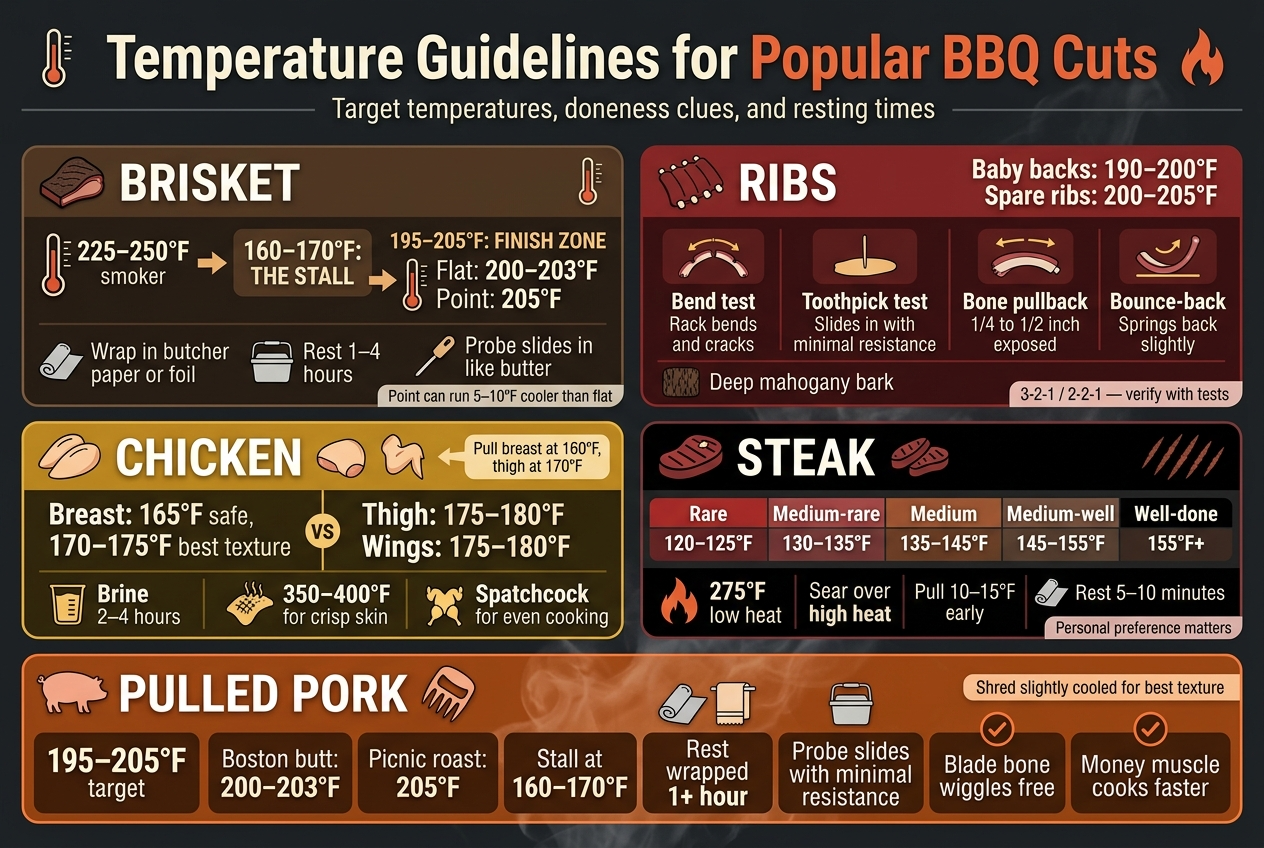
Brisket stands as the crown jewel of BBQ meat temperatures, demanding patience and precision throughout the cooking process. The journey begins when you place your brisket on the smoker at 225-250°F, targeting specific internal temperature milestones that transform tough connective tissue into tender, melt-in-your-mouth perfection.
The first major milestone occurs around 160-170°F internal temperature, known as “the stall.” During this phase, evaporation from the meat’s surface creates a cooling effect that can hold temperatures steady for hours. Many pitmasters wrap their brisket in butcher paper or foil at this point to push through the stall more efficiently. This technique, called the Texas Crutch, helps retain moisture while accelerating the cooking process.
Your brisket reaches the sweet spot between 195-205°F internal temperature. The exact target depends on the specific cut and your desired texture. The flat portion typically finishes around 200-203°F, while the point may need to reach 205°F for optimal tenderness. A properly cooked brisket should offer minimal resistance when you insert a probe thermometer – it should slide in like butter.
Resting periods prove just as critical as hitting the right BBQ meat temperatures. Once your brisket reaches target temperature, wrap it in towels and place it in a cooler for at least one hour, though two to four hours produces even better results. This resting period allows juices to redistribute throughout the meat, ensuring each slice remains moist and flavorful.
Temperature gradients within the brisket require careful monitoring. The thicker point section often runs 5-10 degrees cooler than the flat, so probe both areas to ensure even cooking. Professional pitmasters often separate the point from the flat when temperatures diverge significantly, allowing each section to reach its ideal doneness.
Ribs Doneness Indicators Beyond Temperature
While internal meat temperatures BBQ enthusiasts rely on provide important guidance, ribs demand a more nuanced approach to determining doneness. Baby back ribs typically reach optimal tenderness around 190-200°F internal temperature, while spare ribs may need 200-205°F due to their higher fat and connective tissue content.
The bend test offers a reliable visual indicator for rib doneness. Pick up the rack with tongs at one end – properly cooked ribs will bend significantly, with the meat starting to crack on the surface. If the rack bends too easily and the meat falls apart, you’ve overcooked them. If there’s little bend and no surface cracking, they need more time.
The toothpick test provides another valuable assessment tool. Insert a toothpick between the bones – it should slide in with minimal resistance when ribs are properly cooked. Significant resistance indicates the need for additional cooking time, while no resistance at all suggests overcooking.
Bone exposure serves as a visual cue for doneness. As ribs cook, the meat shrinks back from the ends of the bones, exposing roughly 1/4 to 1/2 inch of bone. This pullback, combined with proper internal temperatures, signals that collagen has broken down sufficiently.
The bounce-back test involves pressing the meat with your finger or tongs. Properly cooked ribs will spring back slightly when pressed but still feel tender. Overcooked ribs won’t bounce back at all, while undercooked ribs will feel firm and resistant to pressure.
Bark development on the surface provides additional confirmation of doneness. A well-formed bark with a deep mahogany color indicates proper moisture loss and Maillard reaction development. The bark should feel firm to the touch but not hard or crusty.
Many pitmasters employ the 3-2-1 method for spare ribs or 2-2-1 for baby backs, but these time-based approaches should always be verified with temperature readings and physical tests. Environmental factors like wind, humidity, and ambient temperature can significantly impact cooking times.
Chicken Breast and Thigh Temperature Differences
Chicken presents unique challenges in grilling internal temperatures due to the significant differences between white and dark meat requirements. Breast meat reaches safe consumption at 165°F according to USDA guidelines, but many BBQ enthusiasts prefer slightly higher temperatures around 170-175°F for optimal texture and juice retention.
Thigh meat benefits from higher temperatures, typically 175-180°F internal temperature. The additional connective tissue and fat in thighs requires more heat to break down properly. Cooking thighs to breast meat temperatures often results in chewy, less flavorful dark meat that doesn’t showcase the cut’s full potential.
The temperature differential between breast and thigh creates timing challenges when cooking whole birds. Professional techniques include spatchcocking (removing the backbone and flattening) to promote even cooking, or separating pieces to cook at optimal temperatures for each cut.
Carryover cooking affects chicken significantly, with internal temperatures rising 5-10 degrees after removal from heat. Account for this phenomenon by pulling breast meat at 160°F and thigh meat at 170°F, allowing residual heat to bring them to target temperatures during resting.
Brining chicken pieces before grilling helps maintain moisture at higher temperatures. A simple salt water solution (1/4 cup salt per quart of water) for 2-4 hours creates a buffer against overcooking while enhancing flavor penetration.
Skin-on chicken requires attention to both meat temperature and skin texture. Cooking at higher heat (350-400°F) initially helps render fat and crisp the skin, then reducing temperature allows gentle cooking to target internal temperatures without burning the exterior.
Wing temperatures follow thigh guidelines due to their similar fat and connective tissue content. Cook wings to 175-180°F for optimal texture and complete fat rendering.
Steak Temperature Preferences from Rare to Well-Done
Steak temperatures represent personal preference more than safety requirements (except for ground beef), with each level offering distinct textures and flavors. Understanding these BBQ temperature mistakes helps prevent ruining expensive cuts through improper cooking.
Rare steaks reach 120-125°F internal temperature, featuring a cool red center with minimal cooked exterior. This temperature preserves maximum tenderness and beef flavor but requires high-quality, properly aged meat from reputable sources.
Medium-rare steaks target 130-135°F, delivering warm red centers with slightly more cooked exterior zones. This temperature range represents the sweet spot for most premium cuts, balancing tenderness with developed flavors from the Maillard reaction.
Medium steaks cook to 135-145°F internal temperature, producing pink centers with firmer texture. While still tender, medium steaks begin losing some of the buttery texture that defines perfectly cooked beef.
Medium-well steaks reach 145-155°F, featuring slightly pink centers with significantly firmer texture. This temperature level works well for leaner cuts that benefit from additional cooking to break down tougher fibers.
Well-done steaks exceed 155°F internal temperature, producing uniform brown color throughout with firm texture. While often criticized by steak enthusiasts, proper technique can still yield flavorful well-done steaks when requested.
Reverse searing techniques help achieve precise steak temperatures. Start cooking at low heat (275°F) until reaching target internal temperature minus 10-15 degrees, then sear over high heat for crust development. This method provides superior temperature control compared to traditional high-heat cooking.
Resting steaks for 5-10 minutes after cooking allows temperature equilibration and juice redistribution. Cover lightly with foil to maintain warmth without creating steam that softens the crust.
Pulled Pork Target Temperatures for Shredding
Pulled pork demands higher cooking temperatures than many realize, with target ranges between 195-205°F internal temperature for optimal shredding texture. The high collagen content in pork shoulder requires extended heat exposure to break down into gelatin, creating the characteristic tender, pull-apart texture.
Boston butt (pork shoulder) typically finishes around 200-203°F, while picnic roasts may need 205°F due to different muscle structure and connective tissue distribution. These safe cooking temperatures ensure complete collagen breakdown while maintaining moisture through rendered fat.
The probe test works exceptionally well for pulled pork. Insert your thermometer probe into the thickest part of the meat – it should slide in with minimal resistance when properly cooked. Significant resistance indicates the need for additional cooking time, regardless of displayed temperature.
Bone movement provides another doneness indicator. In bone-in shoulders, the blade bone should wiggle freely and potentially pull out completely when the meat reaches optimal doneness. This physical test confirms that connective tissue has broken down sufficiently.
Double-wrap resting proves essential for pulled pork quality. Wrap the cooked shoulder in foil, then towels, and place in a cooler for at least one hour. This extended rest period allows temperature equilibration and continued collagen breakdown through residual heat.
Fat cap management affects final temperatures and cooking times. Leaving fat cap intact provides natural basting but may require higher internal temperatures for complete rendering. Trimming to 1/4 inch thickness offers a good balance between protection and efficient cooking.
The stall typically occurs around 160-170°F internal temperature, similar to brisket. Wrapping in butcher paper or foil helps push through this plateau while maintaining bark development. Some pitmasters prefer unwrapped cooking for maximum bark formation, accepting longer cooking times.
Shredding technique impacts final texture regardless of temperature achievement. Allow the pork to cool slightly before shredding to prevent mushiness. Use bear claws or forks to separate the meat along natural grain lines for optimal pulled pork texture.
Different cuts within the shoulder cook at varying rates. The money muscle (a distinct section visible on bone-in shoulders) often finishes before the surrounding meat, requiring careful monitoring to prevent overcooking this prized portion.
Common Temperature Mistakes That Ruin Your BBQ
Checking Temperature Too Frequently and Losing Heat
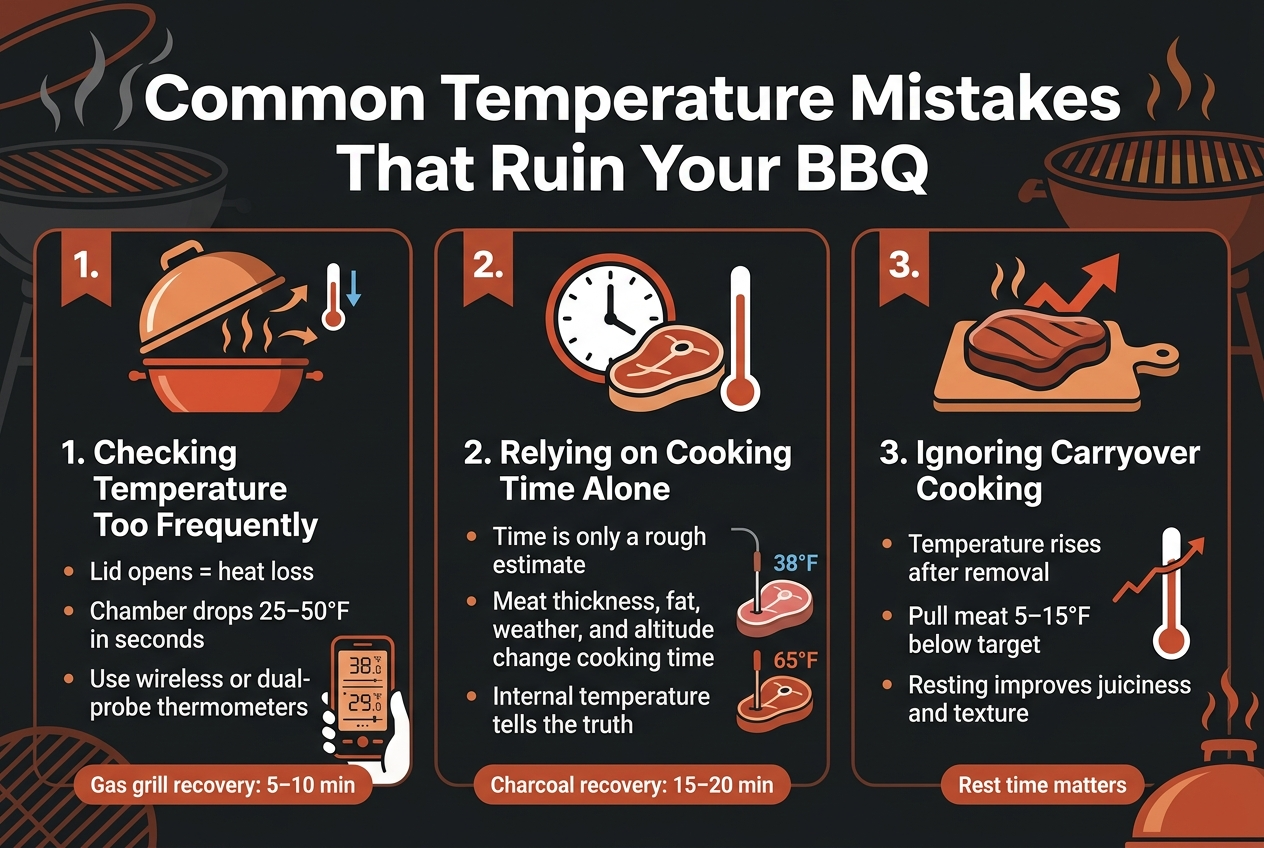
Opening your BBQ lid constantly to check internal meat temperatures is one of the fastest ways to sabotage your cooking efforts. Every time you lift that lid, you’re essentially hitting the reset button on your cooking environment. The heat that took minutes to build up escapes instantly, dropping the chamber temperature by 25-50 degrees Fahrenheit in just seconds.
Picture this scenario: You’re grilling a beautiful brisket, and anxiety gets the better of you. You start checking the meat temperature every 15-20 minutes, thinking you’re being thorough. Each peek adds significant cooking time and creates uneven heat distribution. Your meat ends up taking twice as long to reach safe cooking temperatures, and the texture suffers from inconsistent heat exposure.
Professional pitmasters follow the “if you’re looking, you’re not cooking” rule for good reason. Modern wireless thermometers and Bluetooth-enabled devices eliminate the need for constant lid lifting. These BBQ thermometer guide tools allow you to monitor both chamber temperature and internal meat temperatures from your phone or a remote display unit.
When you absolutely must check manually, limit yourself to once every hour for larger cuts like brisket or pork shoulder. For smaller items like chicken breasts or steaks, resist the urge to check until you’re approaching the estimated completion time. The brief satisfaction of seeing current temperatures isn’t worth the extended cooking times and potential temperature fluctuations.
Temperature recovery after opening your grill varies based on fuel type and weather conditions. Gas grills typically bounce back within 5-10 minutes, while charcoal setups might need 15-20 minutes to stabilize. Wind, ambient temperature, and grill insulation all affect recovery time. On cold winter days, heat loss becomes even more dramatic, making frequent checks particularly damaging to your BBQ timeline.
Smart BBQ enthusiasts invest in dual-probe thermometers that monitor both food and ambient temperatures simultaneously. This setup provides complete cooking data without requiring any lid lifting until your meat reaches the target internal temperature. Many advanced models even send smartphone alerts when your food approaches the desired doneness level.
Relying Solely on Cooking Time Instead of Temperature
Cooking by the clock instead of using proper grilling internal temperatures represents a fundamental misunderstanding of how heat transfer works in barbecue. Time-based cooking might work for boiling pasta, but it’s completely unreliable for achieving consistent BBQ results. Meat thickness, density, fat content, bone structure, and starting temperature all dramatically affect cooking duration.
Consider two identical ribeye steaks from the same animal. One comes straight from the refrigerator at 38°F, while the other sits at room temperature for 30 minutes, reaching 65°F. The cold steak will take significantly longer to reach the same internal temperature, despite identical cooking conditions. Relying on a predetermined timeline would result in one perfectly cooked steak and one that’s dangerously undercooked.
Outdoor cooking introduces additional variables that make time-based methods even less reliable. Wind speed affects heat distribution and fuel consumption. Humidity levels impact how efficiently heat transfers to your meat. Altitude changes boiling points and affects cooking times. A recipe that works perfectly at sea level might fail completely at higher elevations.
Different cuts require vastly different approaches to reach safe cooking temperatures. A thin chicken breast might cook through in 12 minutes, while a thick pork shoulder could need 14 hours. Even within the same cut, natural variations in muscle density and fat marbling create timing differences. Two pork shoulders from the same pig might finish an hour apart under identical cooking conditions.
Professional BBQ competitors never cook by time alone. They understand that meat temperature chart readings provide the only reliable indicator of doneness and food safety. Internal temperatures tell the complete story of what’s happening inside your meat, while external timing only provides rough estimates.
Weather conditions can throw off time-based cooking by hours. Cold winter days require extended cooking periods, while hot summer conditions accelerate the process. Rain and snow create additional challenges that make predetermined timelines completely meaningless. Your thermometer doesn’t lie, but the clock definitely will.
Experienced grillers use time estimates as general guidelines while relying entirely on temperature readings for final decisions. They understand that “low and slow” cooking means maintaining consistent heat levels until the meat reaches target temperatures, regardless of how long that process takes.
Not Accounting for Carryover Cooking During Rest Periods
Carryover cooking represents one of the most misunderstood aspects of BBQ temperature management. Many people think cooking stops when you remove meat from the heat source, but internal temperatures continue rising for 10-30 minutes during the rest period. Ignoring this phenomenon leads to overcooked results and disappointed dinner guests.
Large cuts like brisket, pork shoulder, and whole chickens experience the most dramatic temperature increases during rest periods. A 12-pound brisket might gain 8-15 degrees Fahrenheit after removal from the smoker. This means pulling your brisket at the target temperature of 203°F will result in an overcooked final product reaching 215-218°F.
The science behind carryover cooking involves residual heat continuing to move from the outer layers toward the center of the meat. Thicker cuts retain more heat and experience more significant temperature increases. Dense muscle fibers store thermal energy that takes time to dissipate, creating internal cooking that continues long after leaving the grill.
Smart pitmasters remove their meat 5-15 degrees below target temperatures, depending on the cut size and thickness. A thick ribeye steak should come off the grill at 125°F to reach a perfect medium-rare 130-135°F after resting. Pork shoulder benefits from removal at 195°F, allowing carryover cooking to bring it to the ideal 203°F for easy shredding.
Resting periods serve multiple purposes beyond managing carryover cooking. Muscle fibers relax and reabsorb juices that were pushed toward the surface during cooking. Collagen finishes converting to gelatin, improving texture and moisture retention. Proper resting transforms good BBQ into exceptional BBQ, but only when you account for continued temperature increases.
Different meat types require varying rest periods and temperature adjustments. Poultry typically gains 3-5 degrees during a 10-15 minute rest. Beef steaks might increase 2-8 degrees depending on thickness. Large roasts and whole birds experience the most dramatic changes, sometimes gaining 10-15 degrees over 30-45 minutes.
Environmental factors affect carryover cooking intensity. Wrapping meat in foil or placing it in insulated containers extends the temperature rise period. Room temperature, humidity, and air circulation all influence how quickly internal temperatures stabilize. Professional cooks adjust their pull temperatures based on these variables.
Monitoring temperatures during rest periods helps you understand carryover patterns for different cuts and cooking methods. This knowledge allows you to fine-tune your approach and consistently hit target temperatures. Keep detailed notes about temperature increases for various meats to improve your BBQ temperature mistakes avoidance skills.
Advanced thermometer systems with continuous monitoring capabilities show real-time temperature changes during rest periods. These tools help you learn exactly when temperatures peak and begin declining, providing valuable data for future cooking sessions. Understanding these patterns transforms you from a guessing cook into a precision BBQ master.
The key to managing carryover cooking lies in patience and observation. Don’t panic if temperatures continue rising after removing meat from heat. This process is completely normal and actually beneficial when properly managed. Plan your pull temperatures accordingly, and you’ll consistently achieve perfect doneness levels that impress every guest at your table.

Getting your meat temperatures right makes all the difference between a memorable BBQ and a disappointing one. With the right thermometer in hand and knowledge of safe internal temperatures, you’ll serve perfectly cooked chicken, beef, pork, and lamb every time. Remember to check your thermometer placement and avoid those common mistakes that can turn a great cut of meat into something tough or unsafe.
Start practicing these temperature guidelines at your next cookout and watch how much better your BBQ becomes. Your guests will notice the difference, and you’ll feel confident knowing every piece of meat is cooked exactly how it should be. Keep that thermometer handy and trust the numbers – your taste buds will thank you.
We use AI Tools to help create these blog posts and help get as much quality information to those that use our site.. We do our best to check everything..

Recent News & Updates

Best Wood for Open Fire Cooking UK: The Expert’s Guide to Live Fire Flavour
Most outdoor cooks believe the secret to a perfect ribeye lies in the seasoning, but the truth is far more elemental. Real live-fire...

Our Story, Values and Beliefs
Here at the BBQ experts we have a passion for BBQ food, outdoor living and spending time with family and friends. We offer you; A...